
Overview
This document outlines the recommended foundational setup for Pipedrive, designed to ensure your CRM is both scalable and immediately useful. Whether you're handling inbound leads from paid channels or manually adding opportunities, this guide serves as a reference point for both internal teams and clients.
You can use it as:
- A self-guided implementation checklist
- A visual reference for recorded demo content
- A shareable playbook for non-technical stakeholders
Each section below breaks down the core components of a high-functioning Pipedrive system.
SECTION 1: BARE MINIMUM PIPEDRIVE BUILD
Why It Matters
A well-structured Pipedrive instance keeps your sales process consistent, improves reporting accuracy, and reduces friction for your team. This “bare minimum” setup is what we consider the non-negotiable foundation across all client builds, regardless of niche.
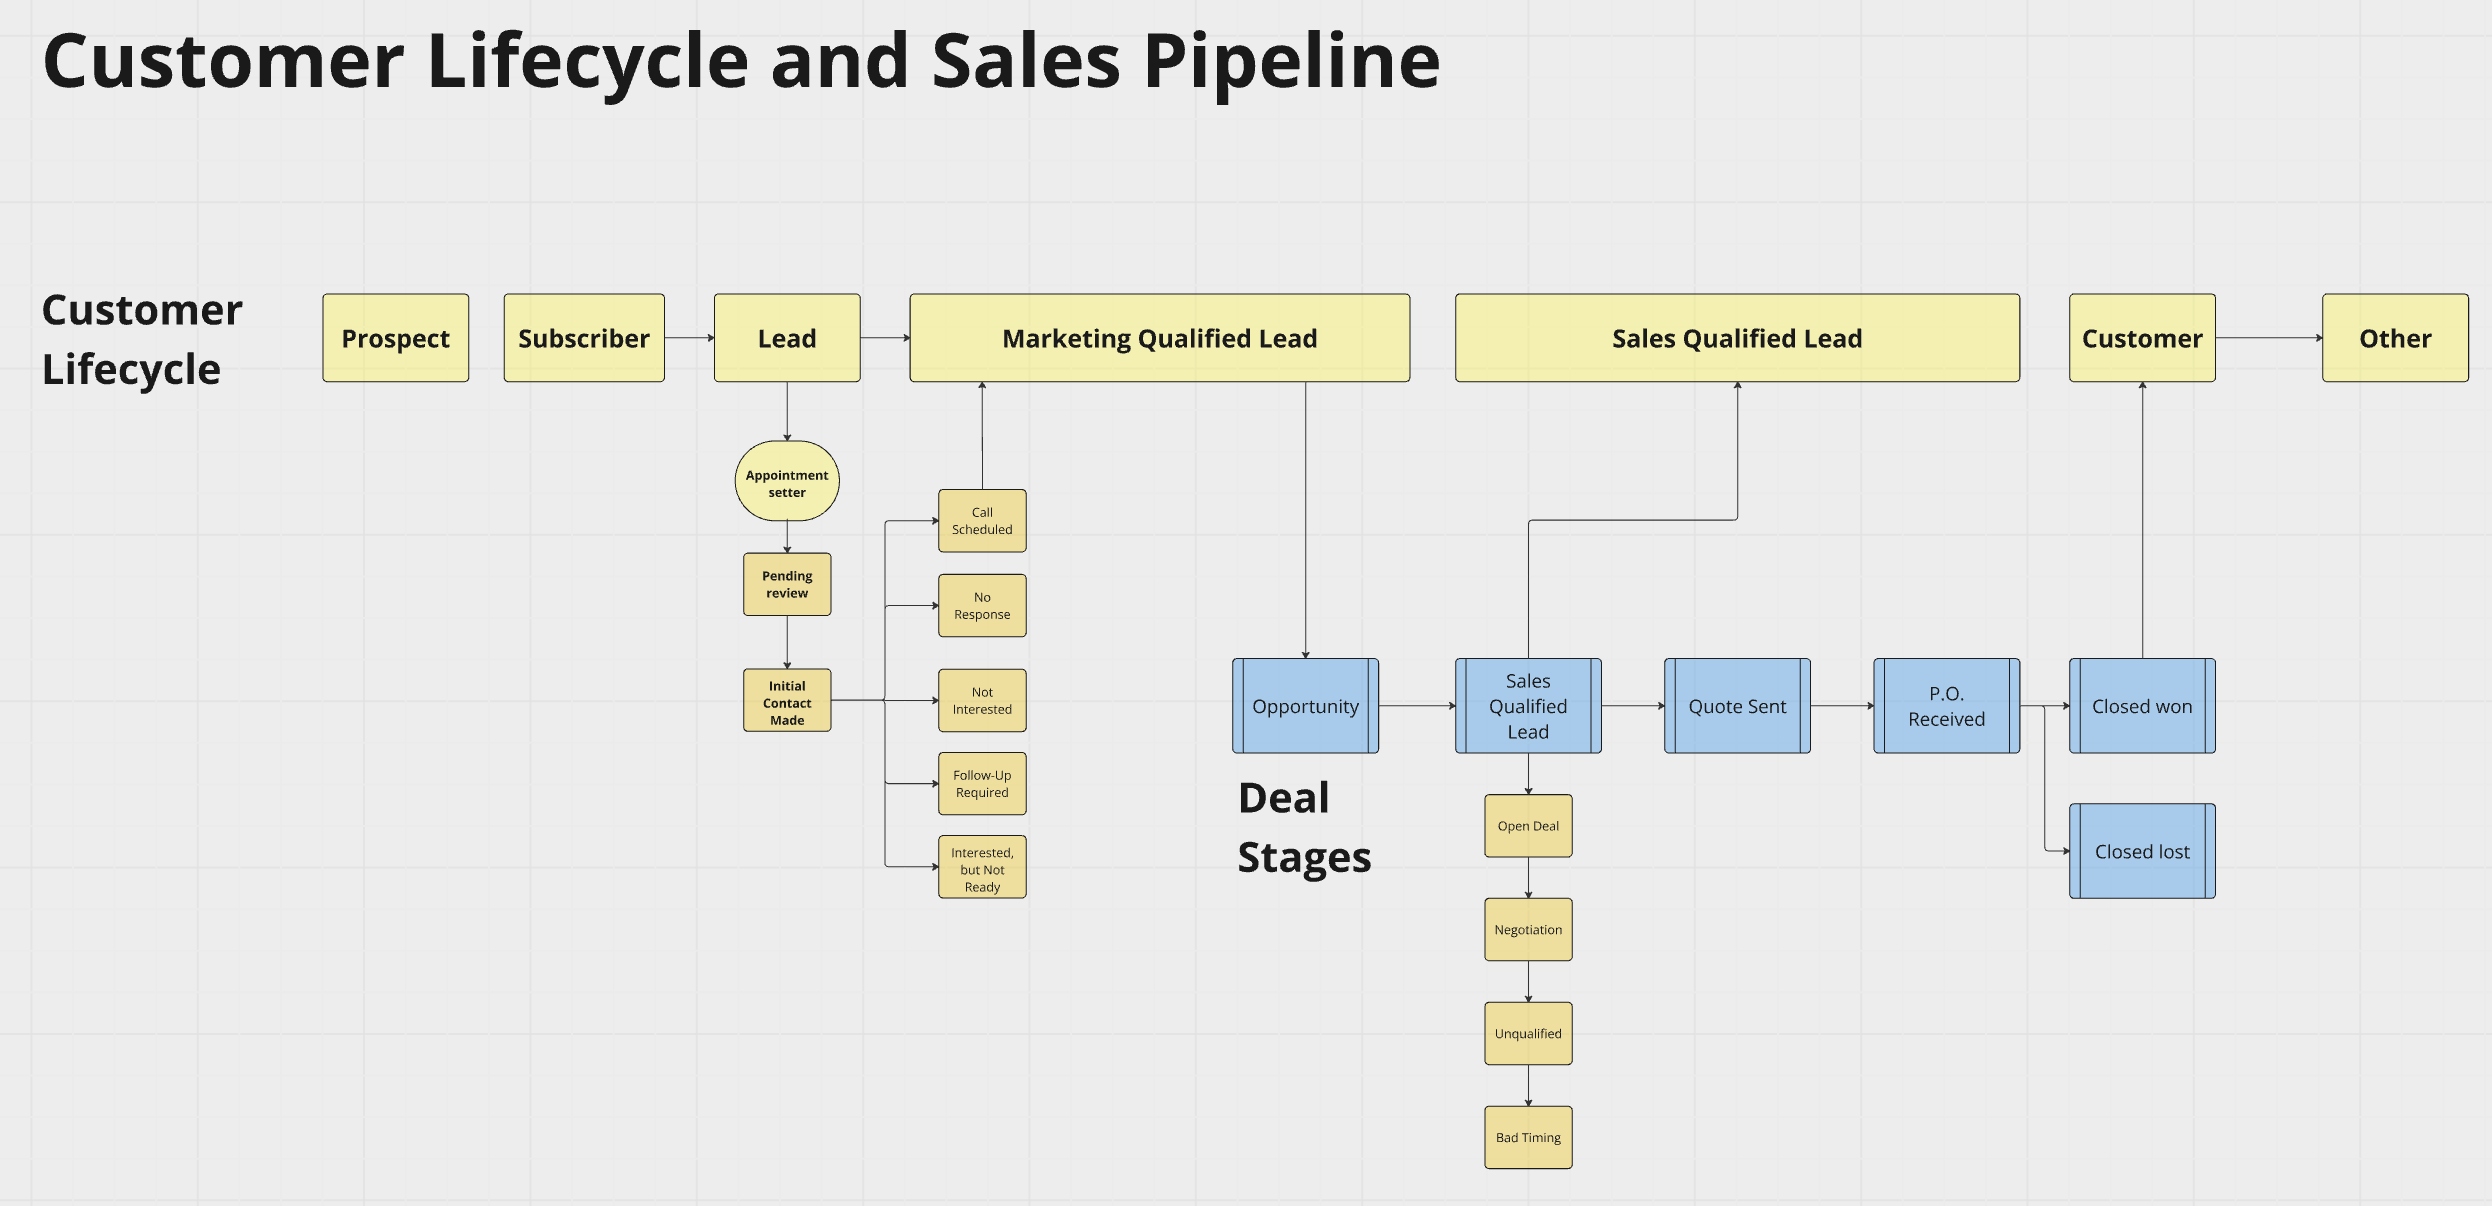
1. Plan Before You Build
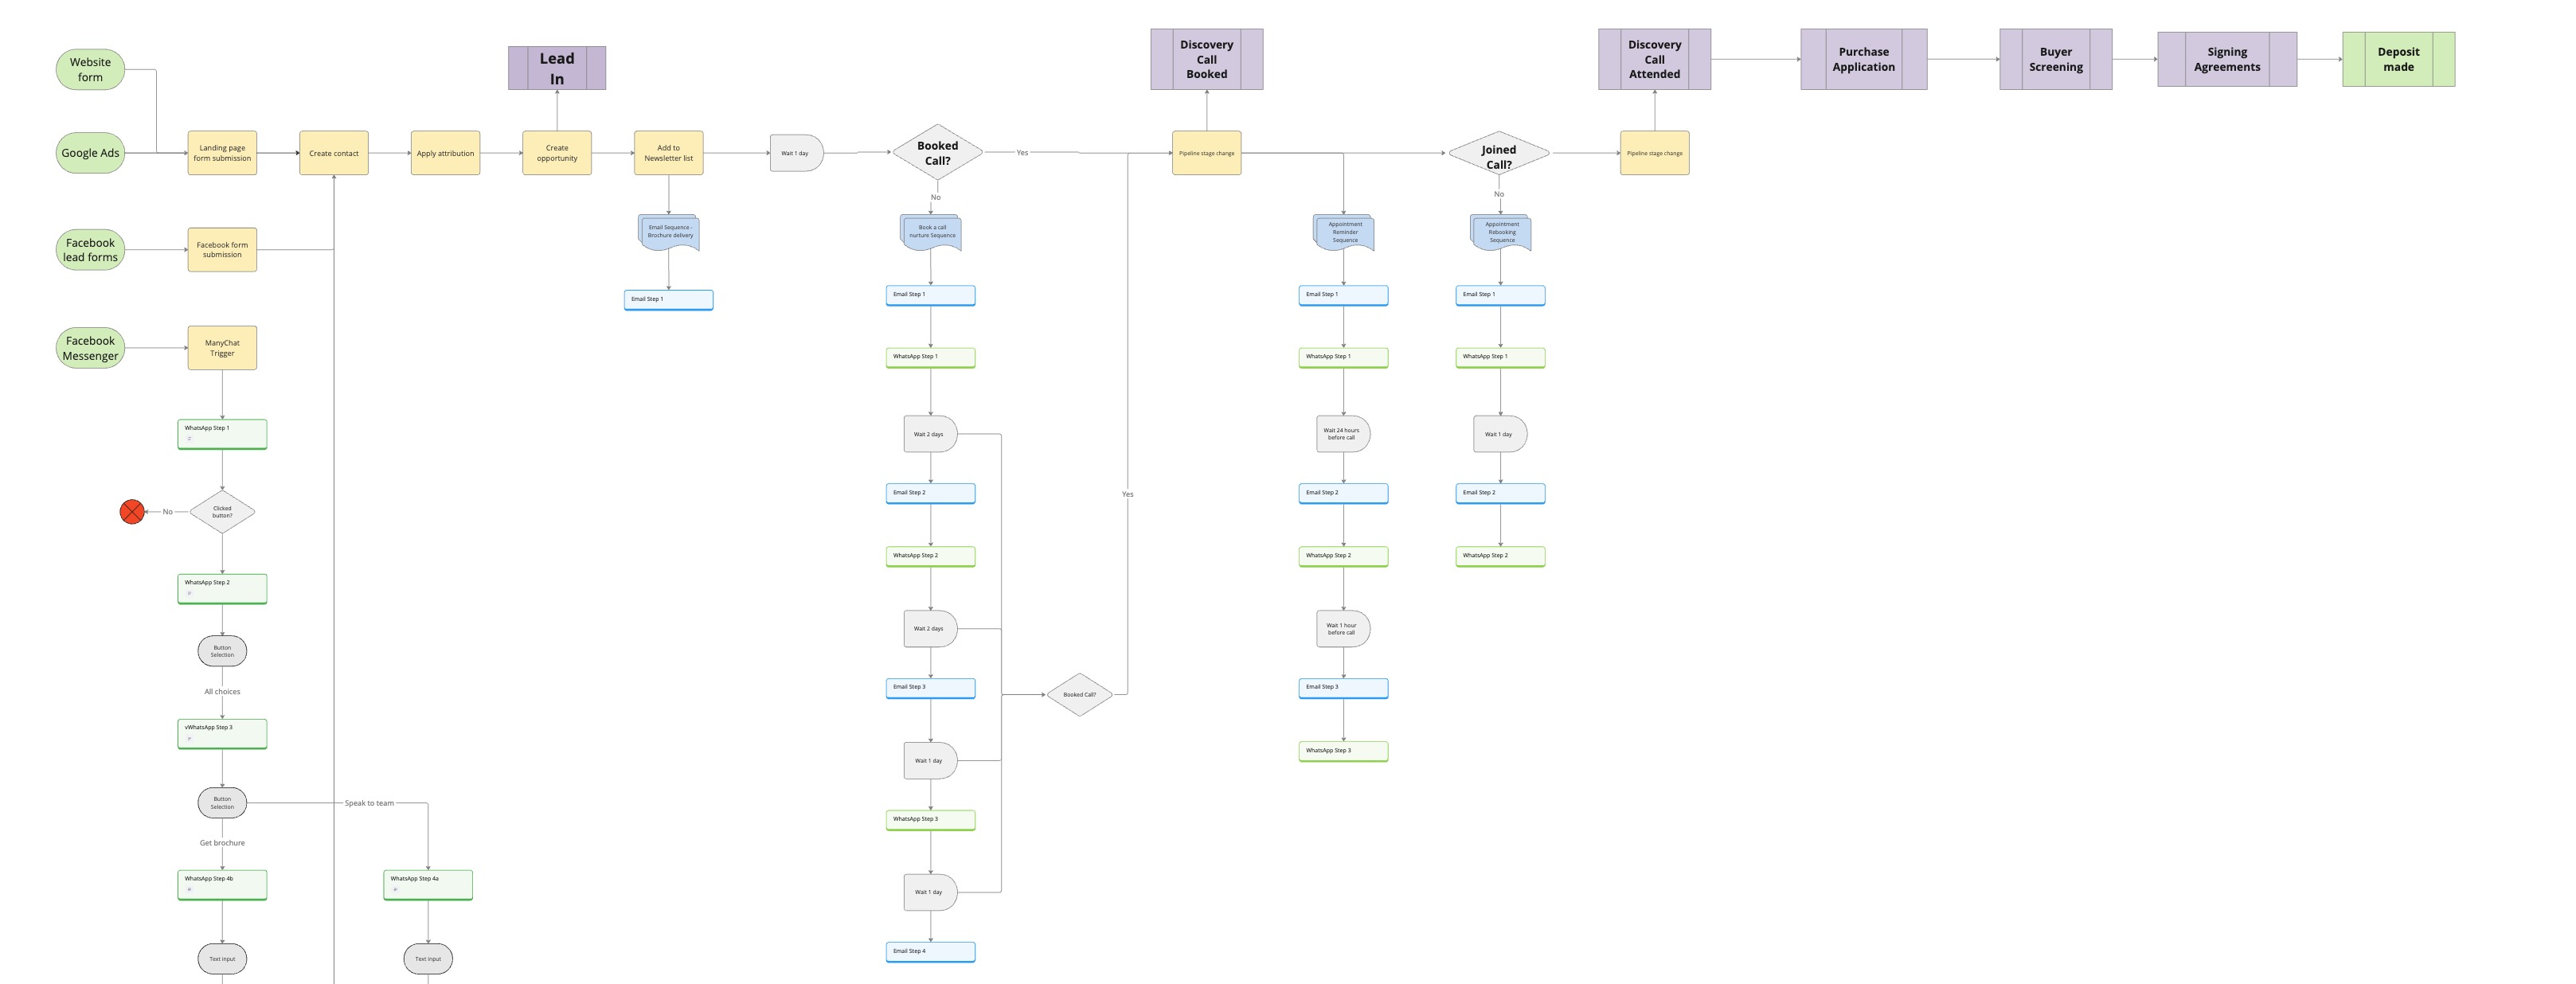
Before setting up any automations or pipelines, it’s essential to map your sales process end to end. This includes:
- Lead entry points (e.g. Meta Ads, Google Ads, website forms)
- Pipeline stages from initial inquiry to close
- Key email and SMS touchpoints
- Criteria for qualifying or disqualifying leads
- Where handoffs and follow-ups occur
- What data you want to collect at each stage
📌 Tip: Even a simple whiteboard diagram or Lucidchart flow makes identifying gaps much easier later on.
2. Set Up Dashboards
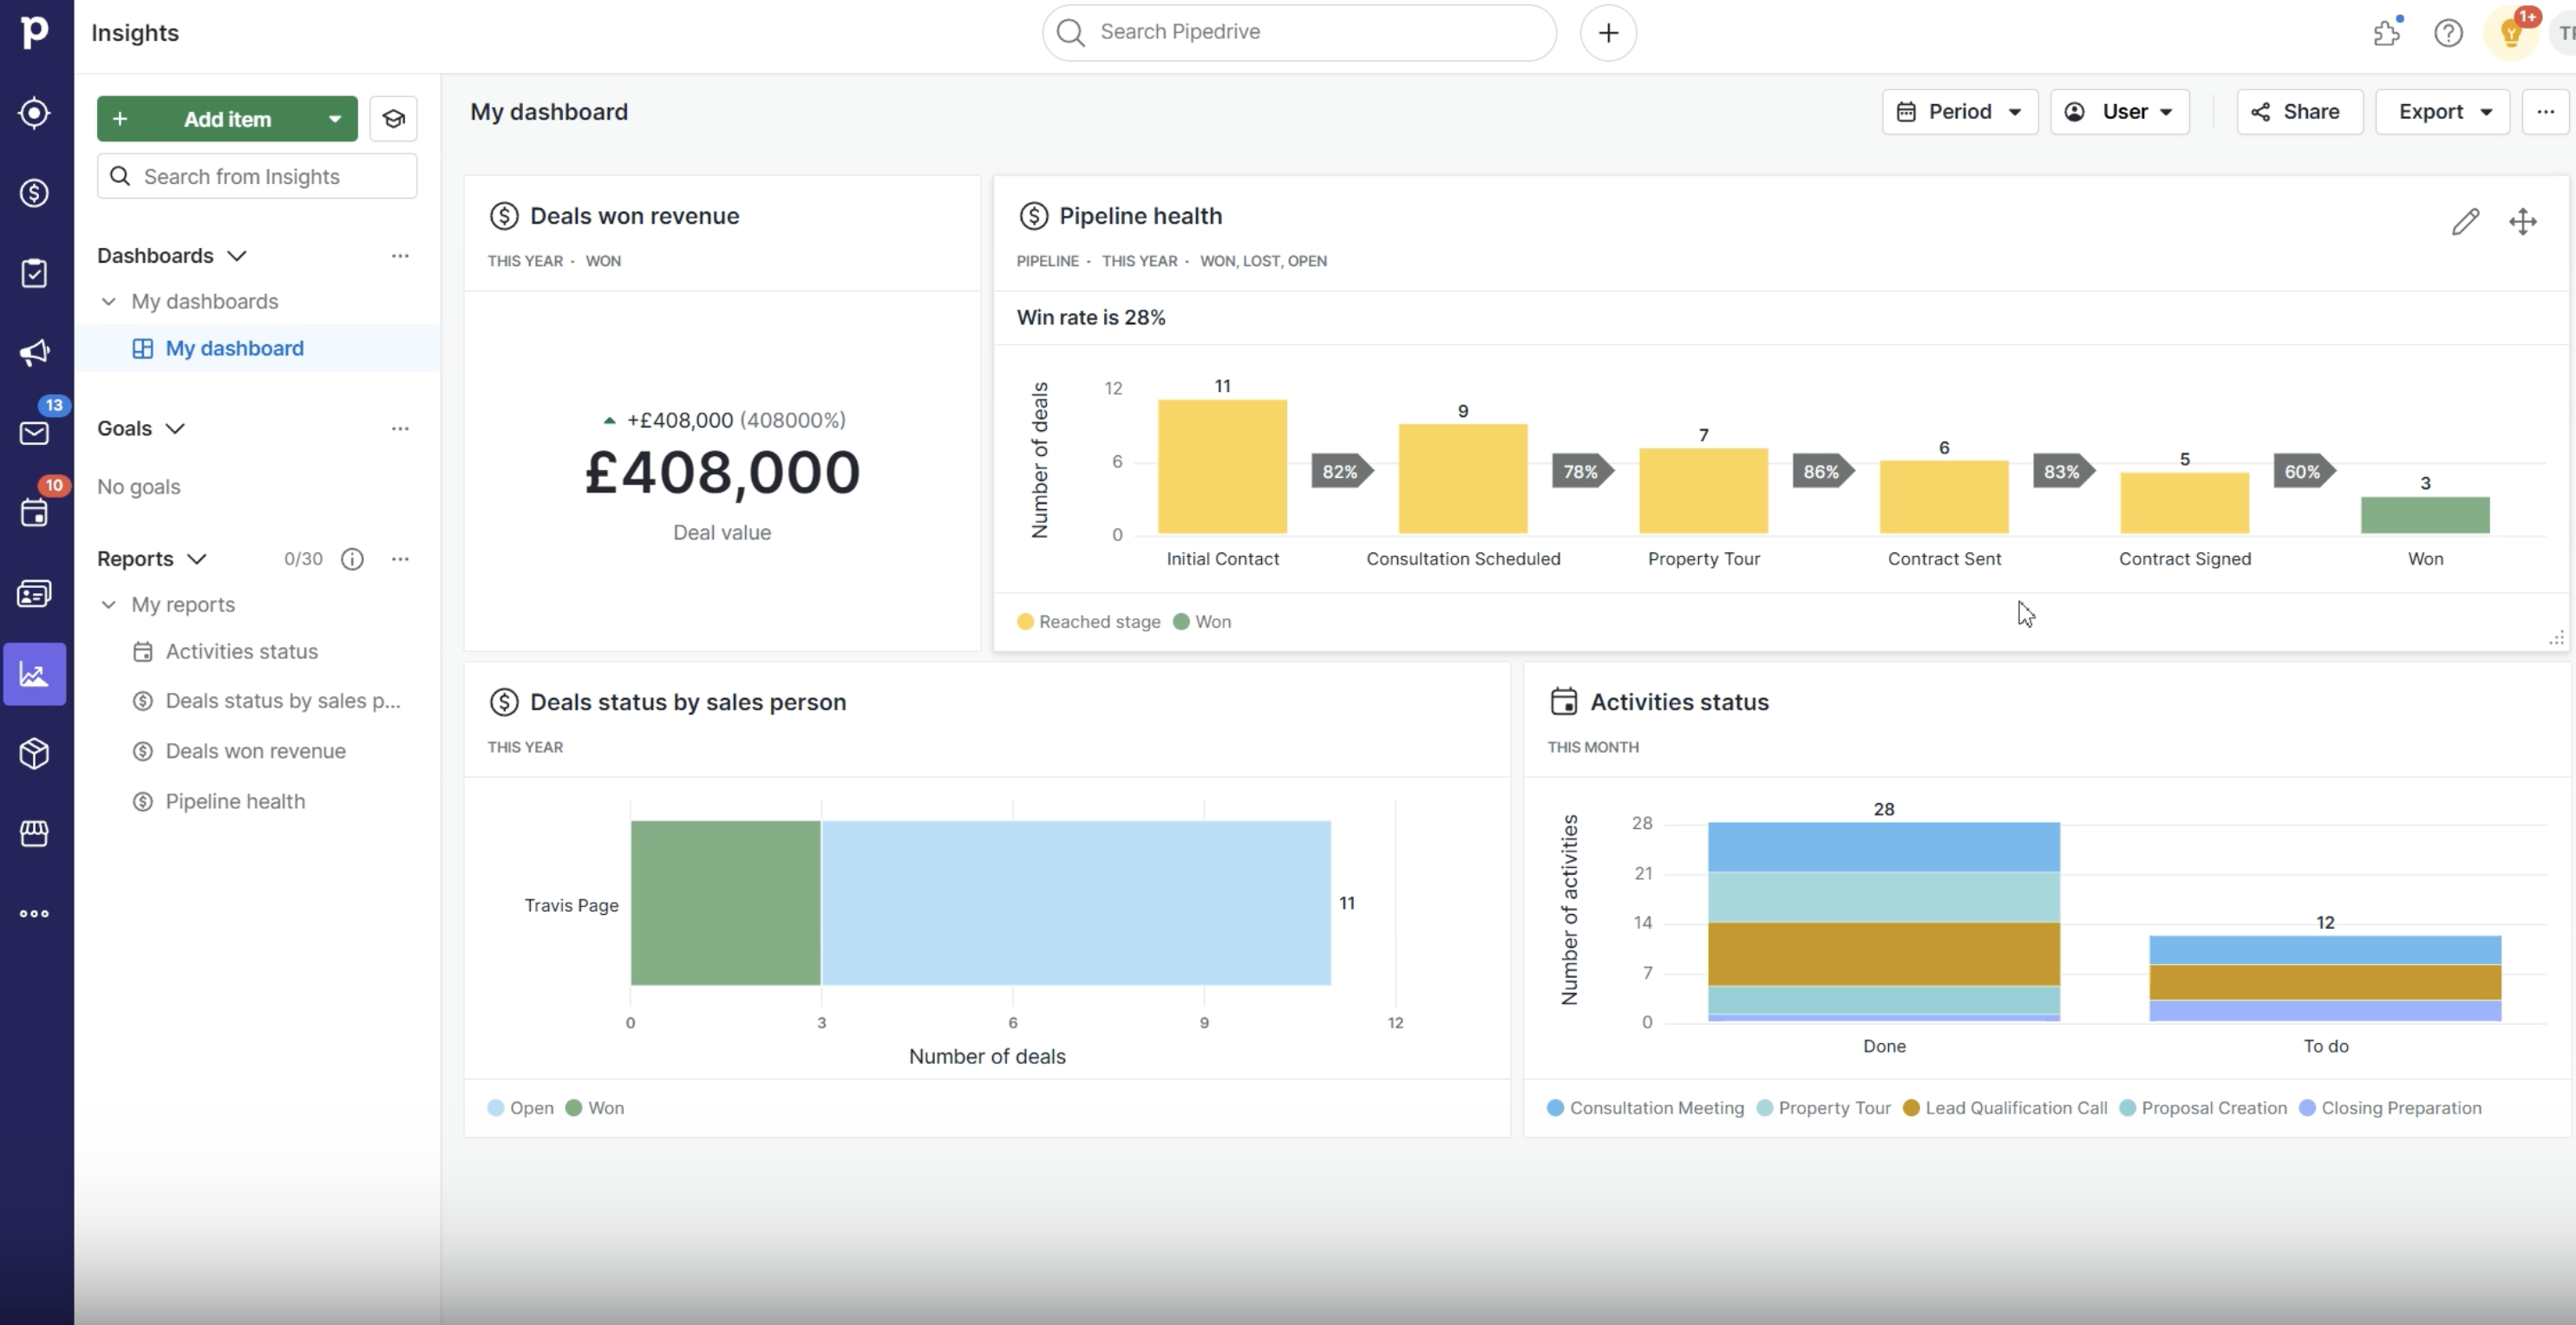
Dashboards should reflect your sales KPIs. At minimum, you should display:
- Pipeline health (e.g. # of deals by stage)
- Deals won/lost over time
- Activity breakdown (calls made, emails sent)
- Conversion rates between stages
These dashboards are most useful when reviewed weekly during sales meetings.
Example dashboard👇
Bonus
See what your sales team needs to see.
3. Configure Lead Capture (Forms & Inbox)
Ensure your setup includes:
- Integration with lead sources like website forms, Meta/Google Ads, and manual imports
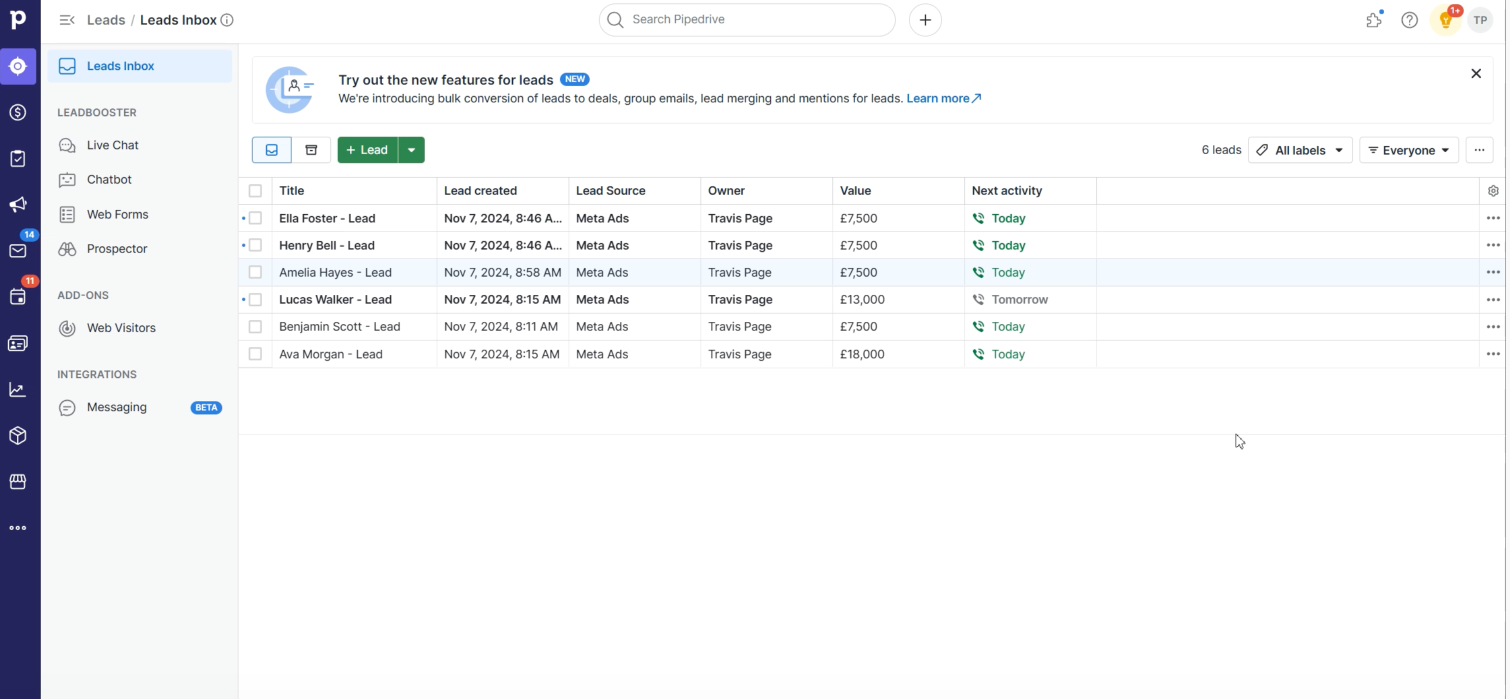
- Routing all new entries into the Lead Inbox, not directly as deals
- Automatic tagging with lead source and UTM data (if applicable)
- Auto-assigned follow-up activity (e.g. “Call Lead - New Inquiry”)
- Visibility indicators (e.g. bolded inbox entries for unread/new leads)
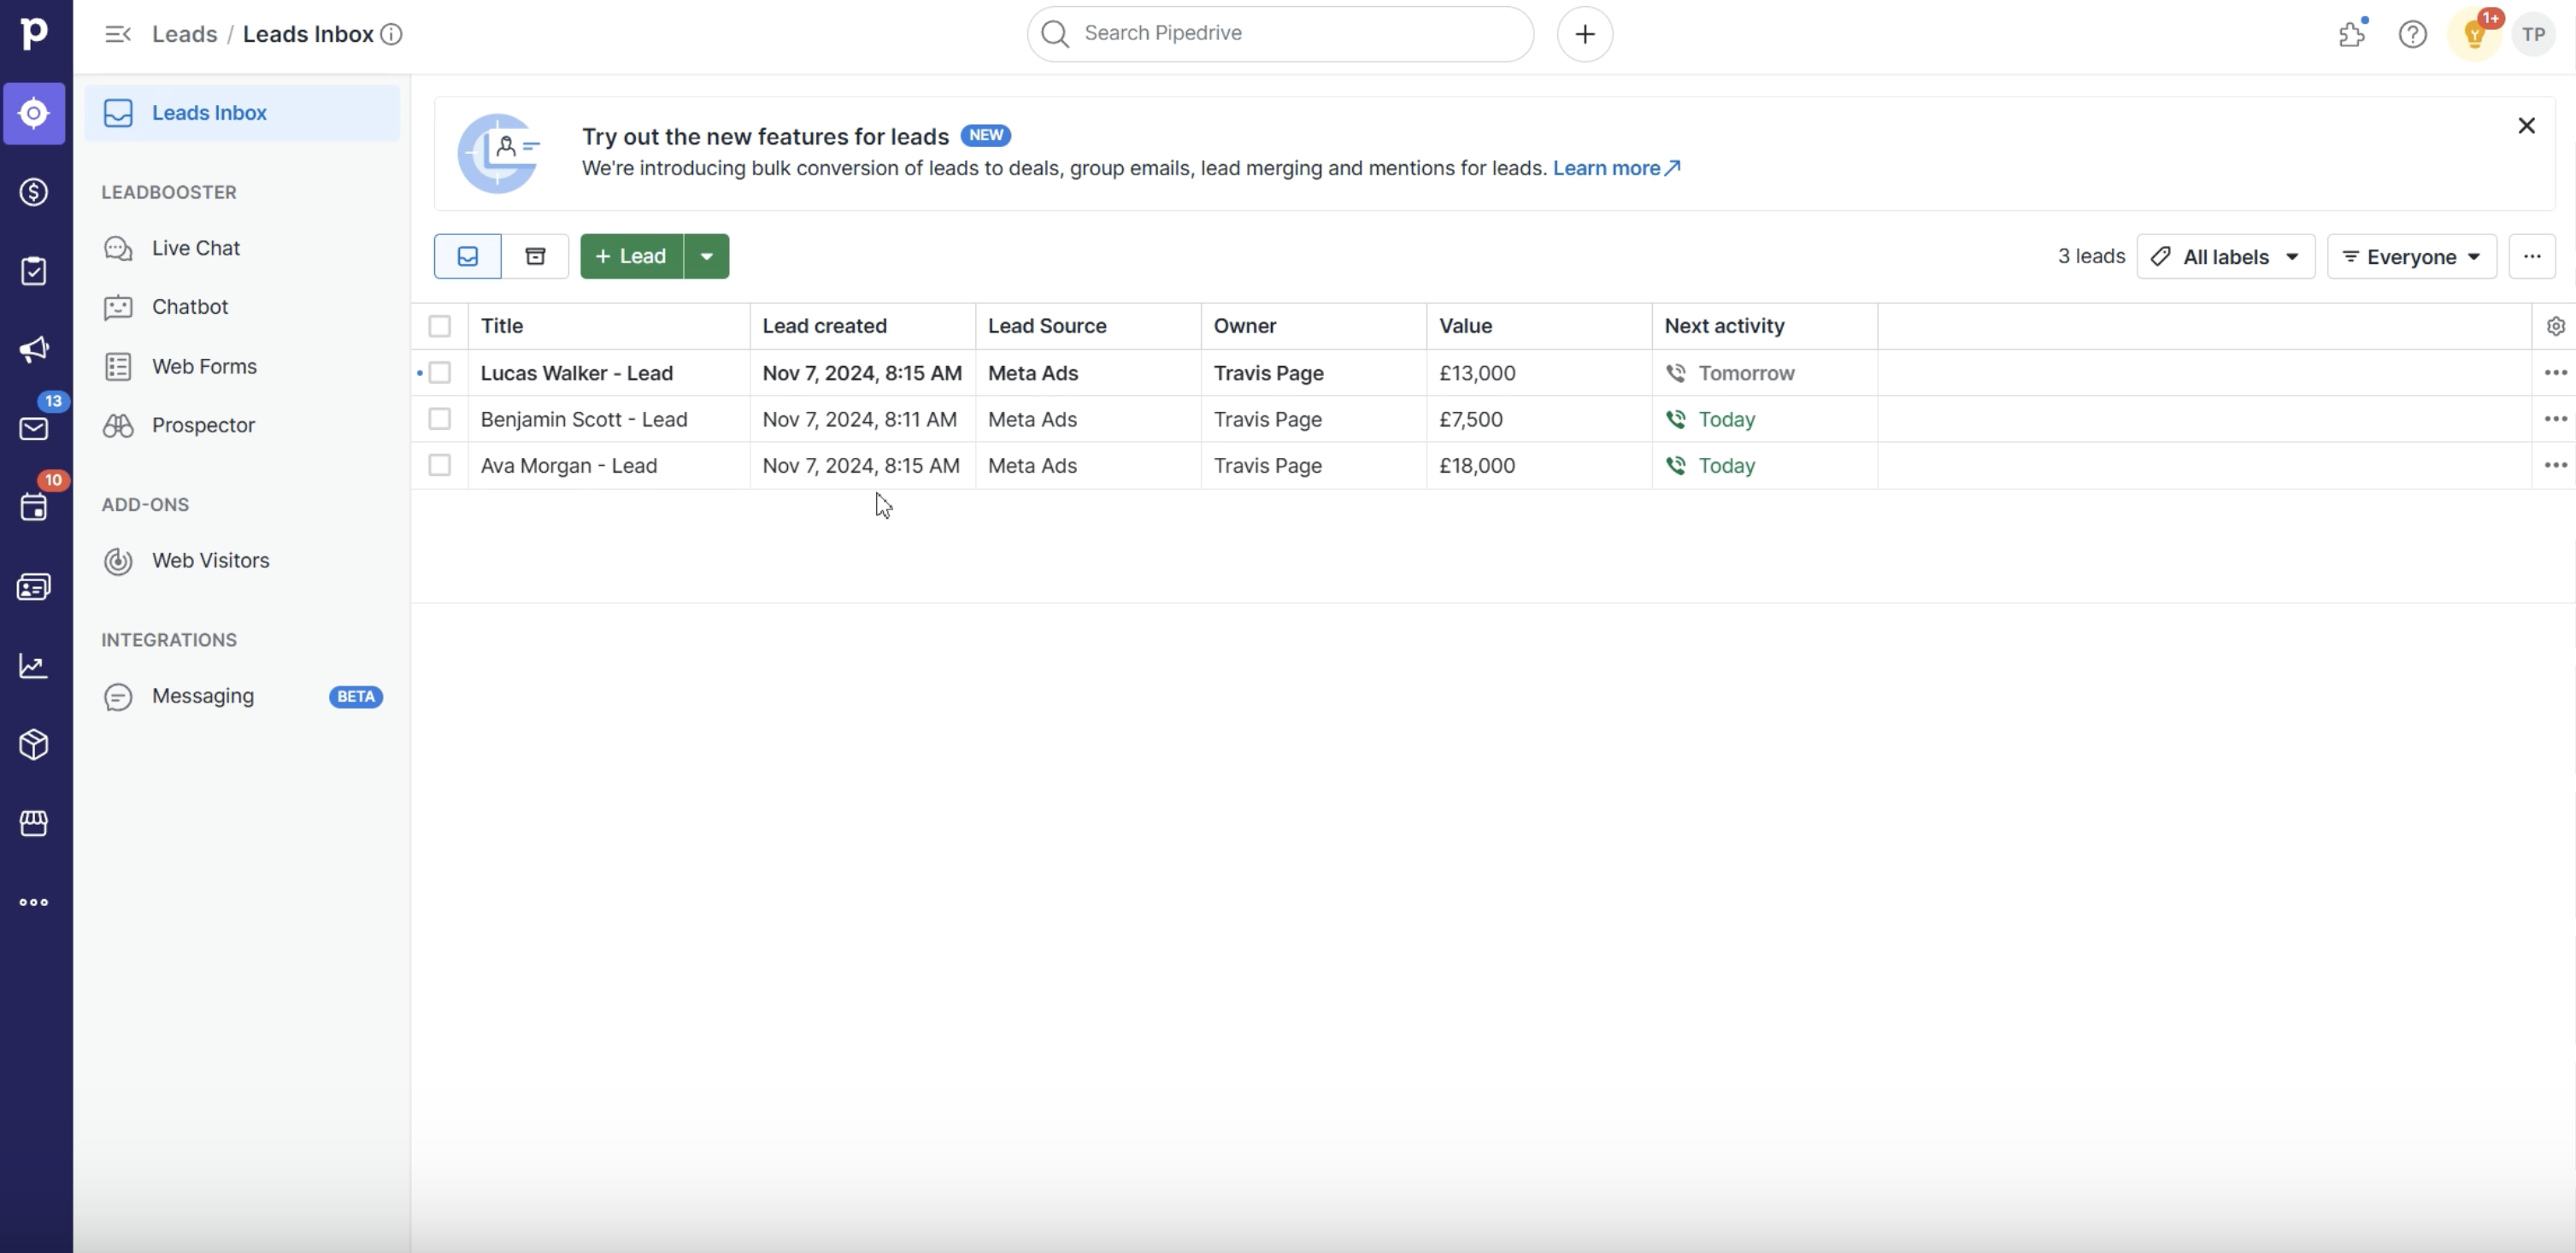
📌 Avoid: Creating deals immediately from form fills — this skews reporting and inflates pipeline value with unqualified leads.
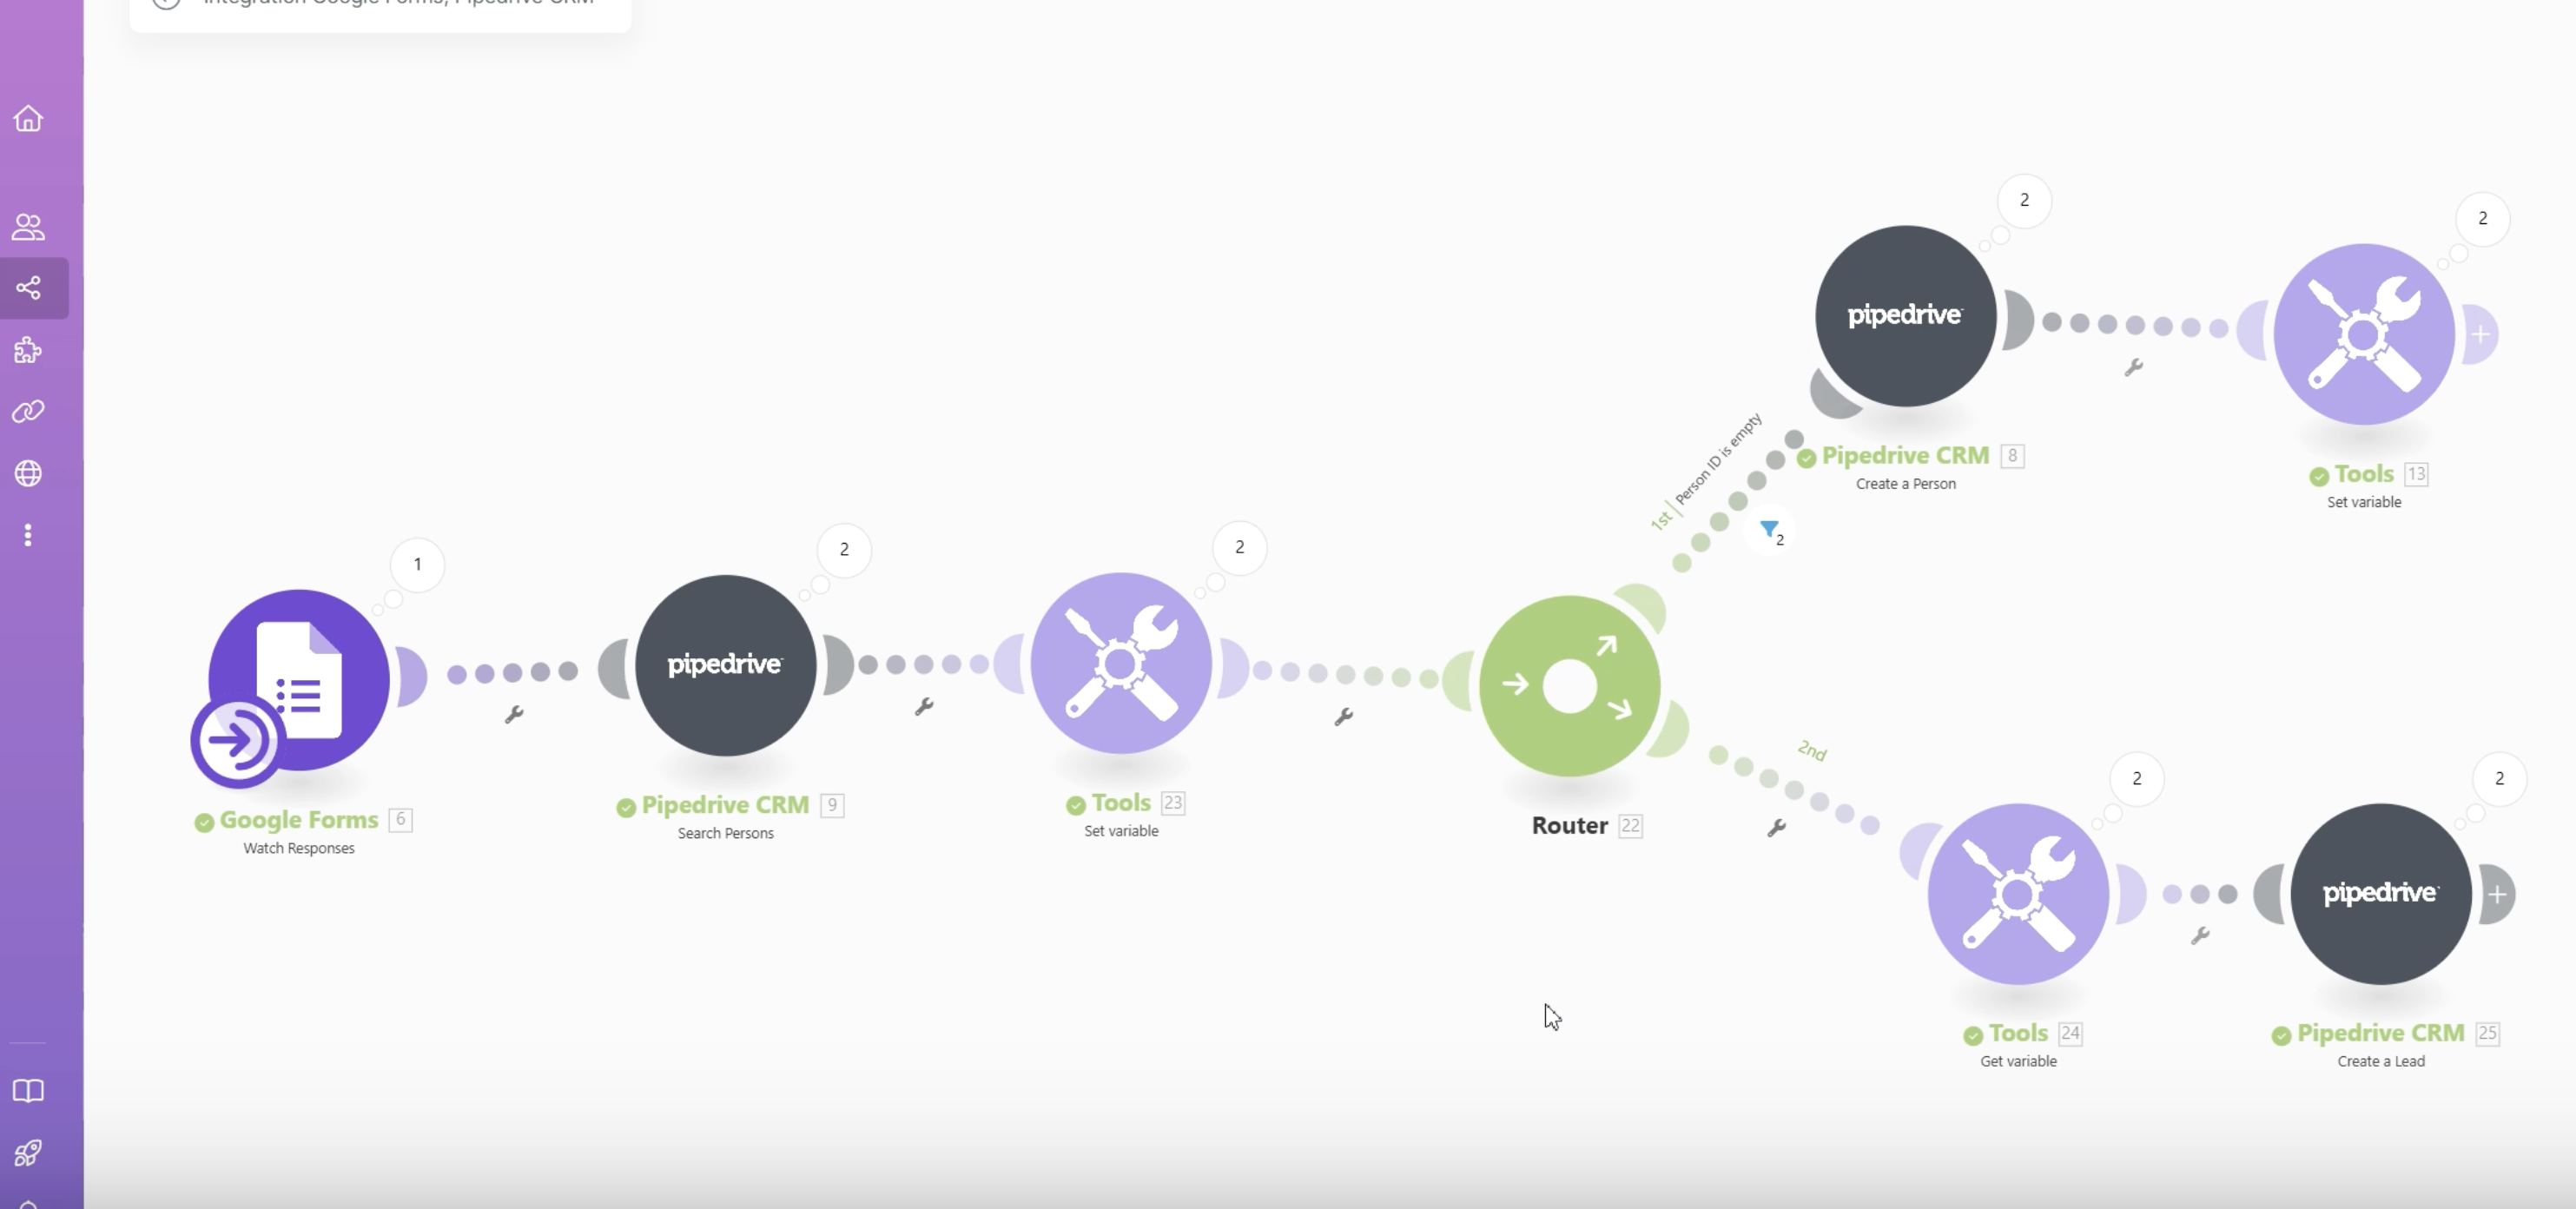
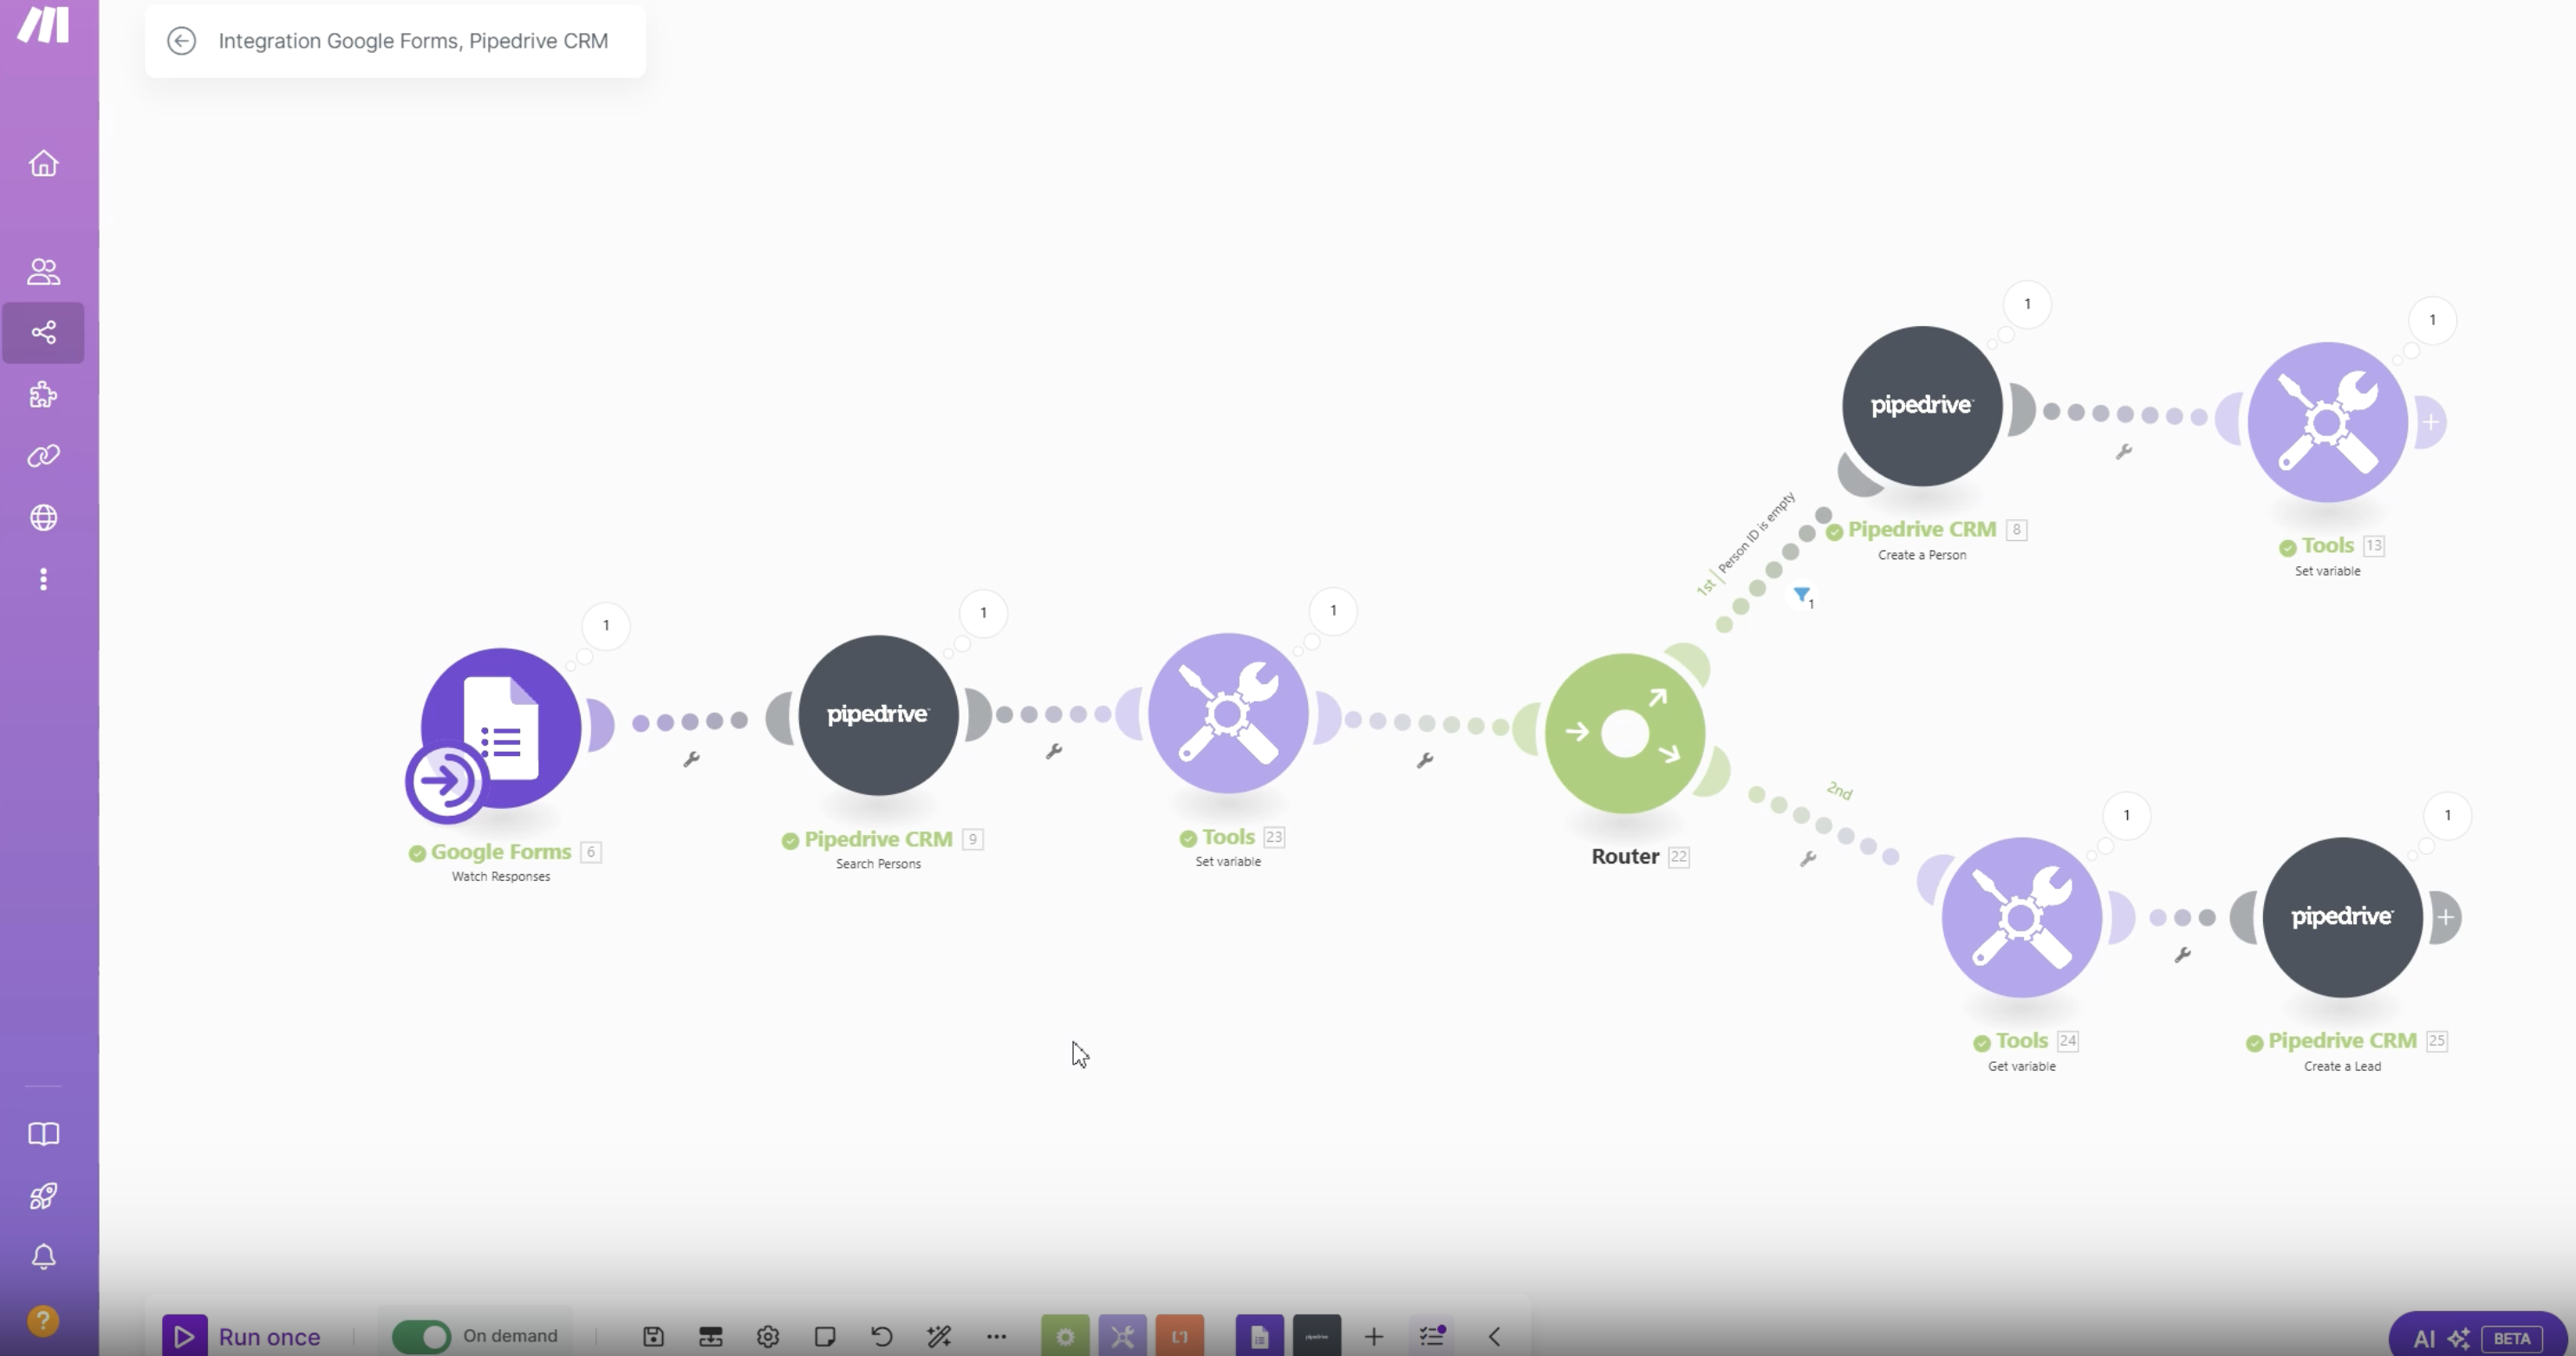
💡Pro tip: Consider using automations to automatically route new lead submissions via forms to pipedrive directly
4. Customize Your Pipeline + Data Fields
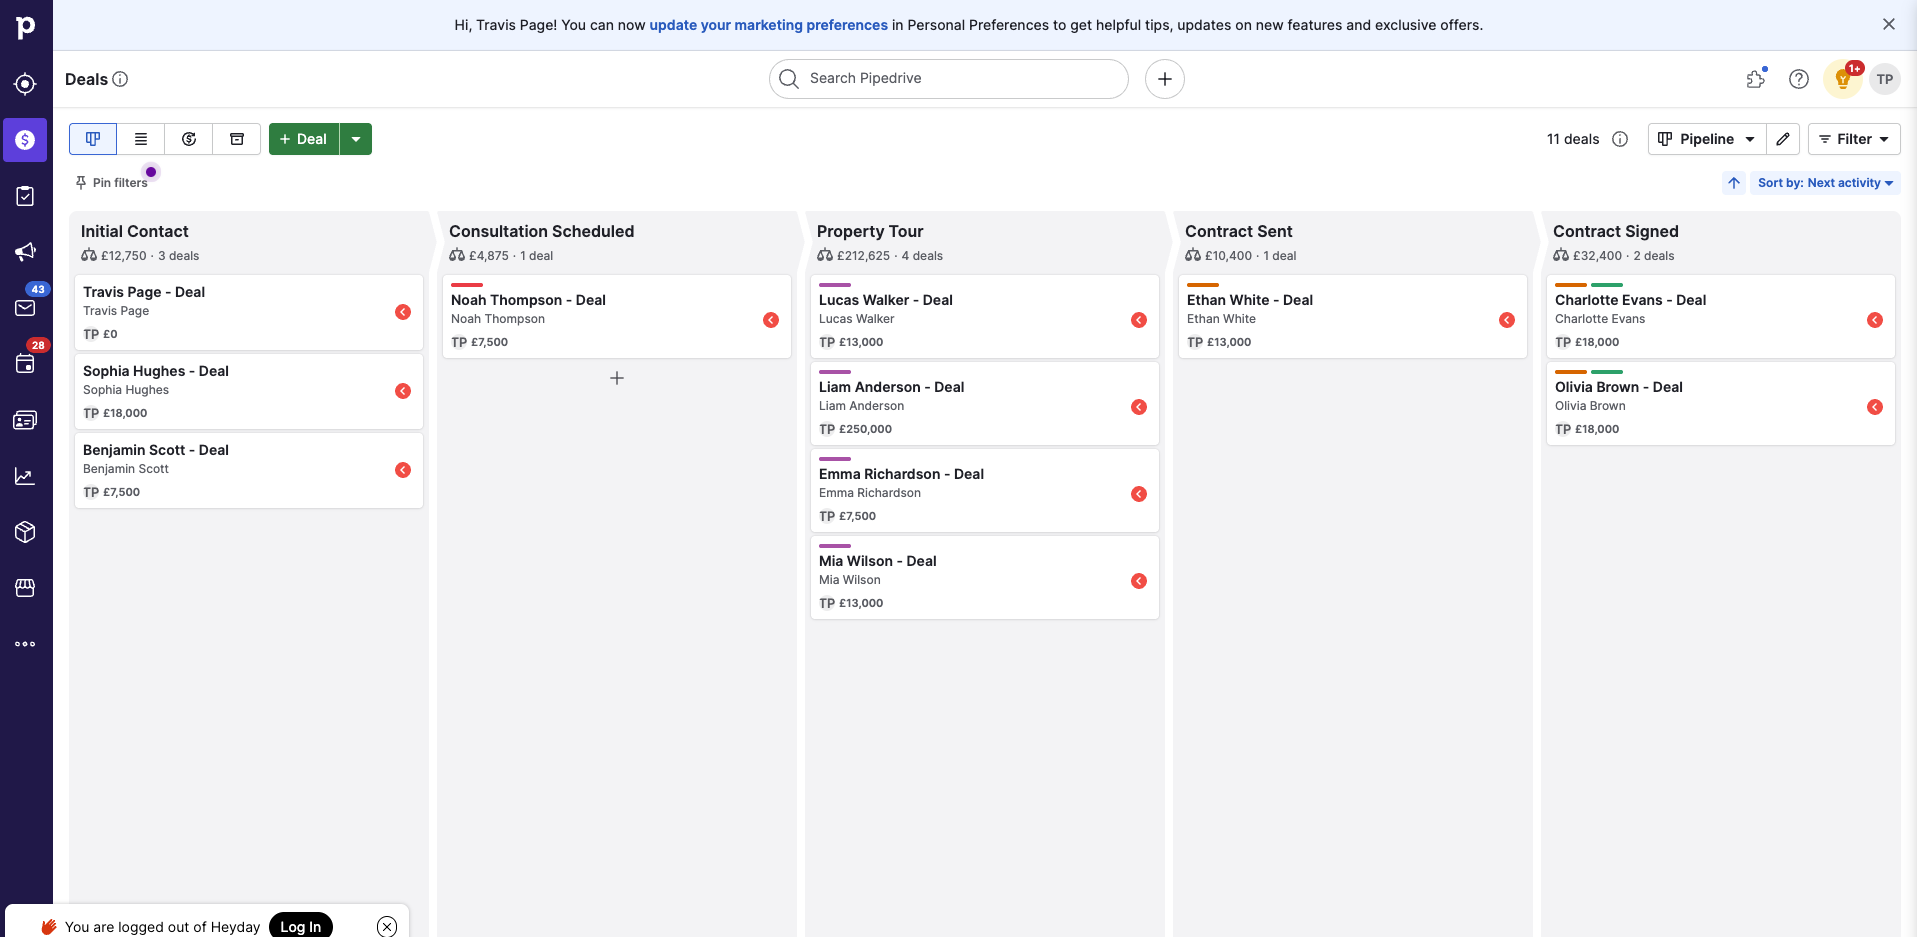
Make sure your pipeline stages reflect your actual sales process, not generic placeholders. For example:
- “Initial Contact”
- “Qualification Call Booked”
- “Consultation Held”
- “Proposal Sent”
- “Verbal Confirmation”
- “Deal Won / Deal Lost”
Also, add custom fields per object type:
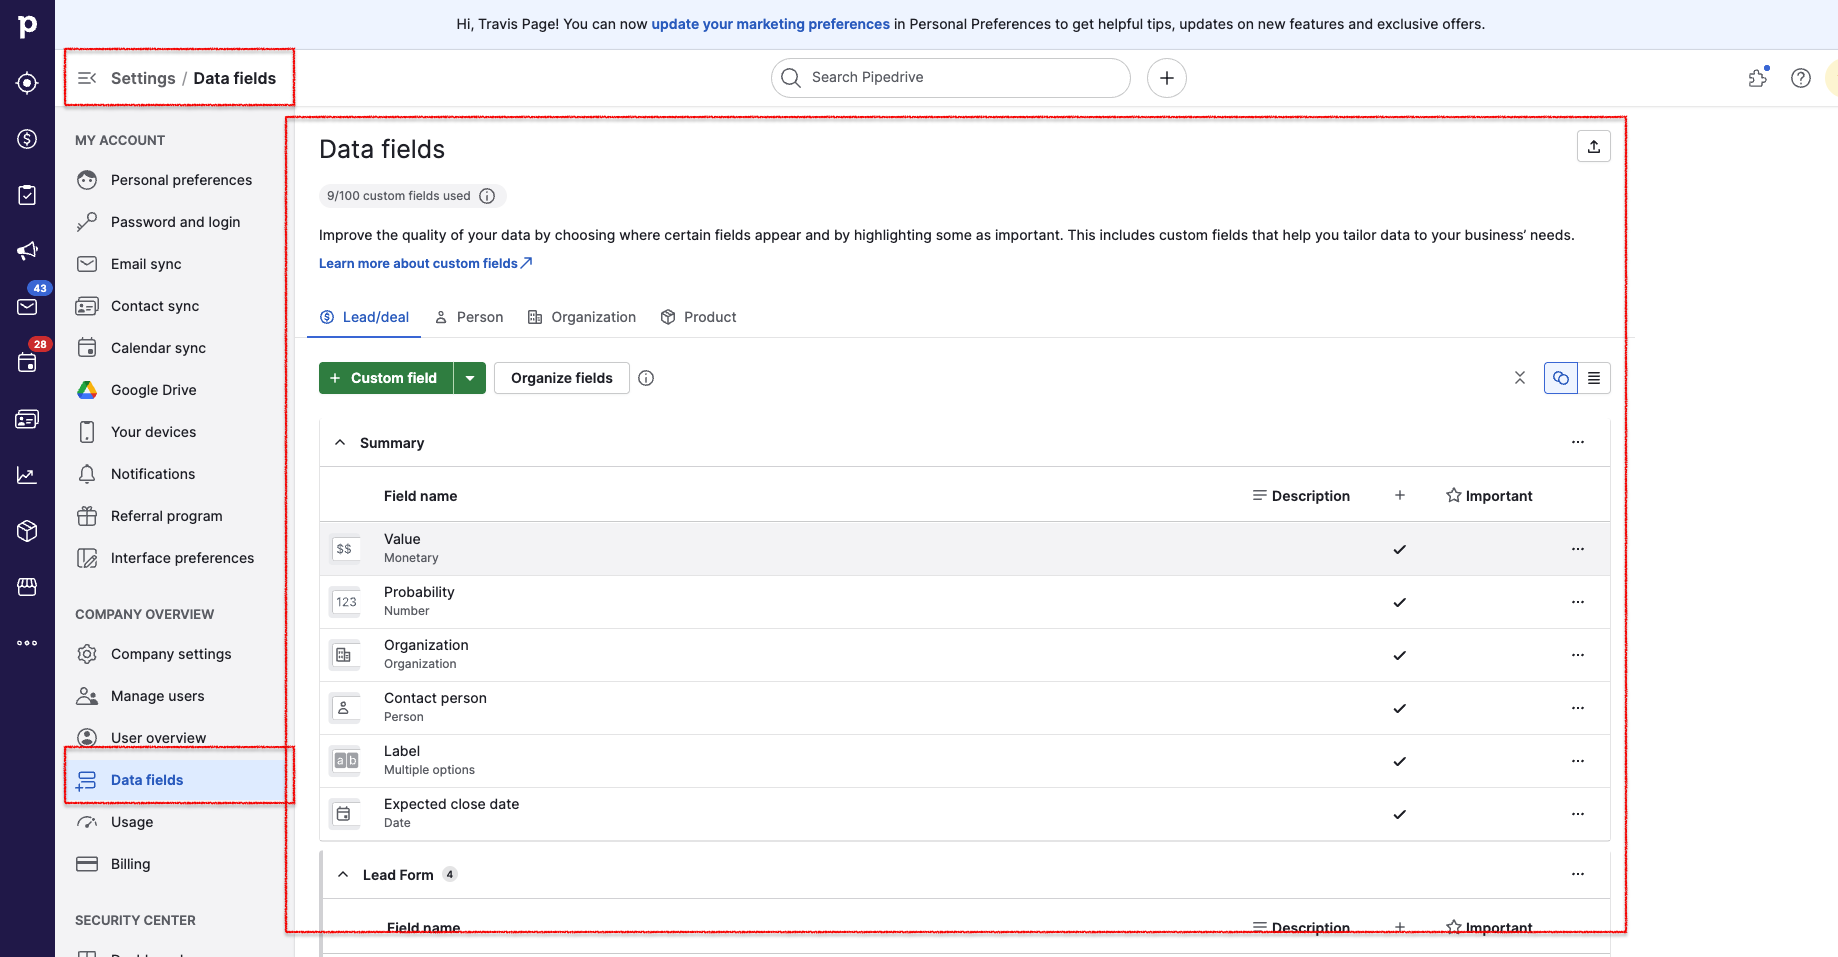
- Deals: Investment budget, timeline to close, source
- People: Phone number, role/title
- Organizations: Sector, size, geographic location
- Products: Pre-configured units or services offered
💡 Pro tip: Again just like before, if you map this out, this gets a lot easier!
5. Sync Email & Create Templates
Email integration ensures all communication is logged and centralized. Setup includes:
- Syncing your sales team's email accounts
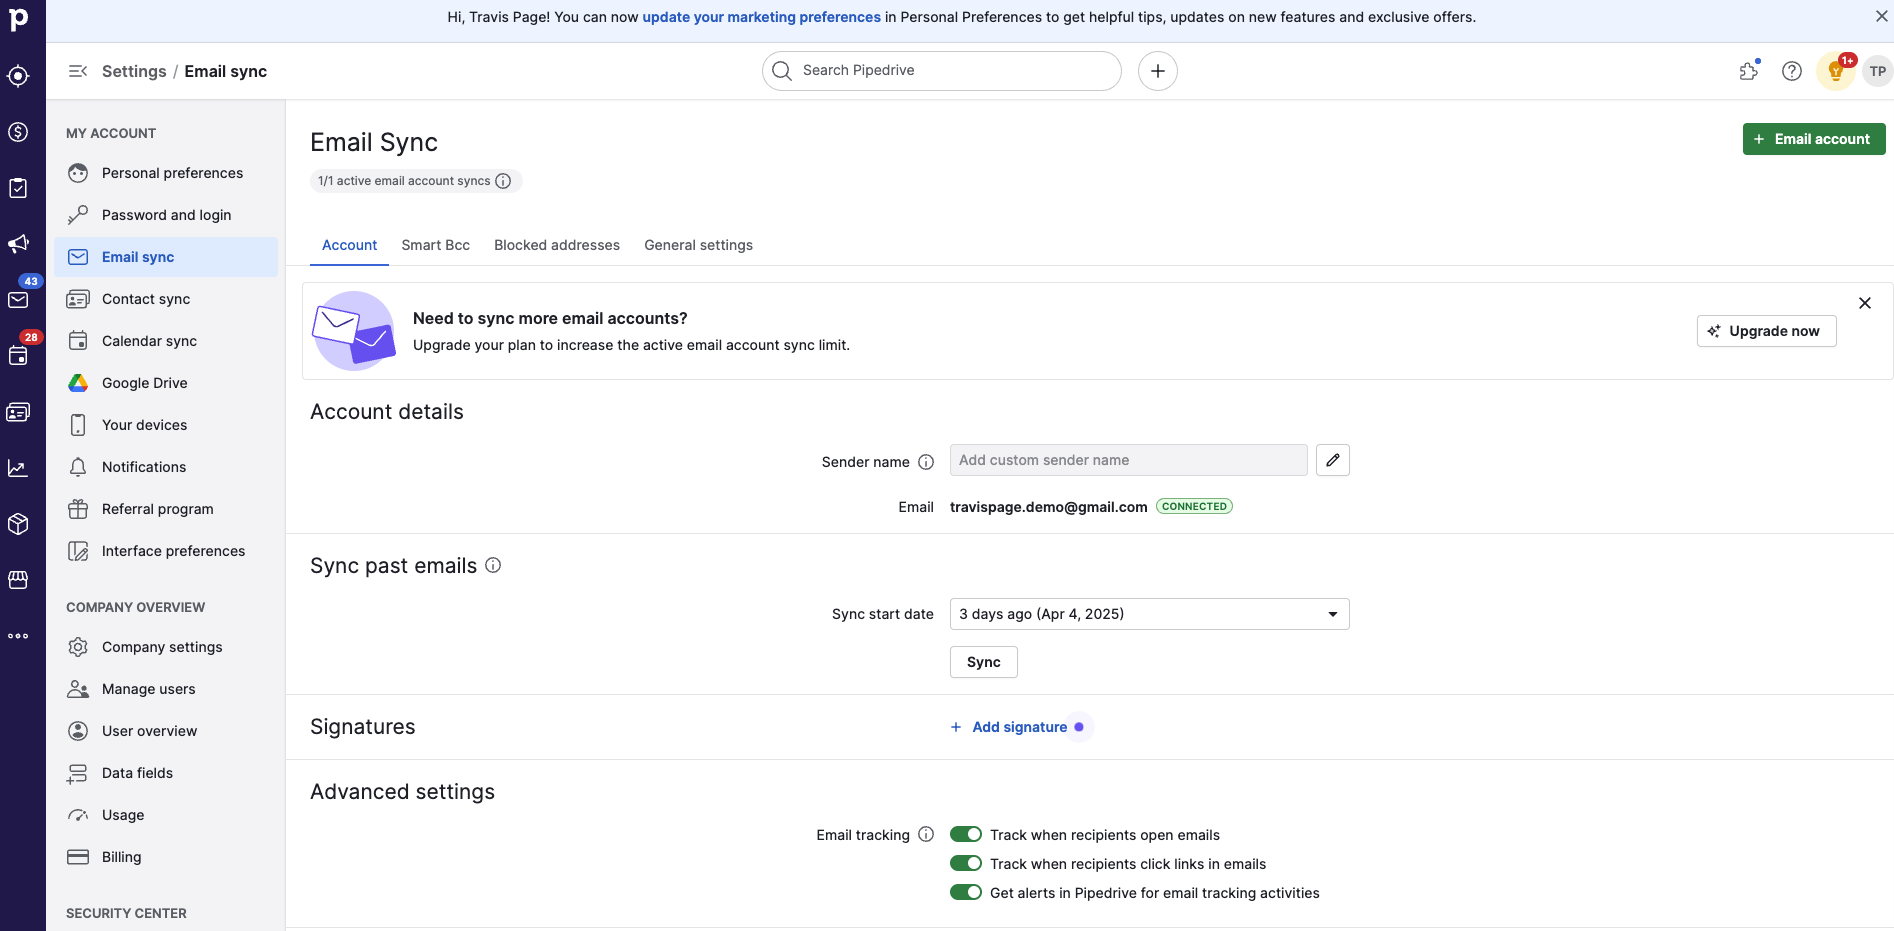
- Enabling tracking (open rates, reply rates)
- Pre-building templates for common responses like:
- “Due Diligence Pack”
- “Booking Confirmation”
- “Next Steps After Call”
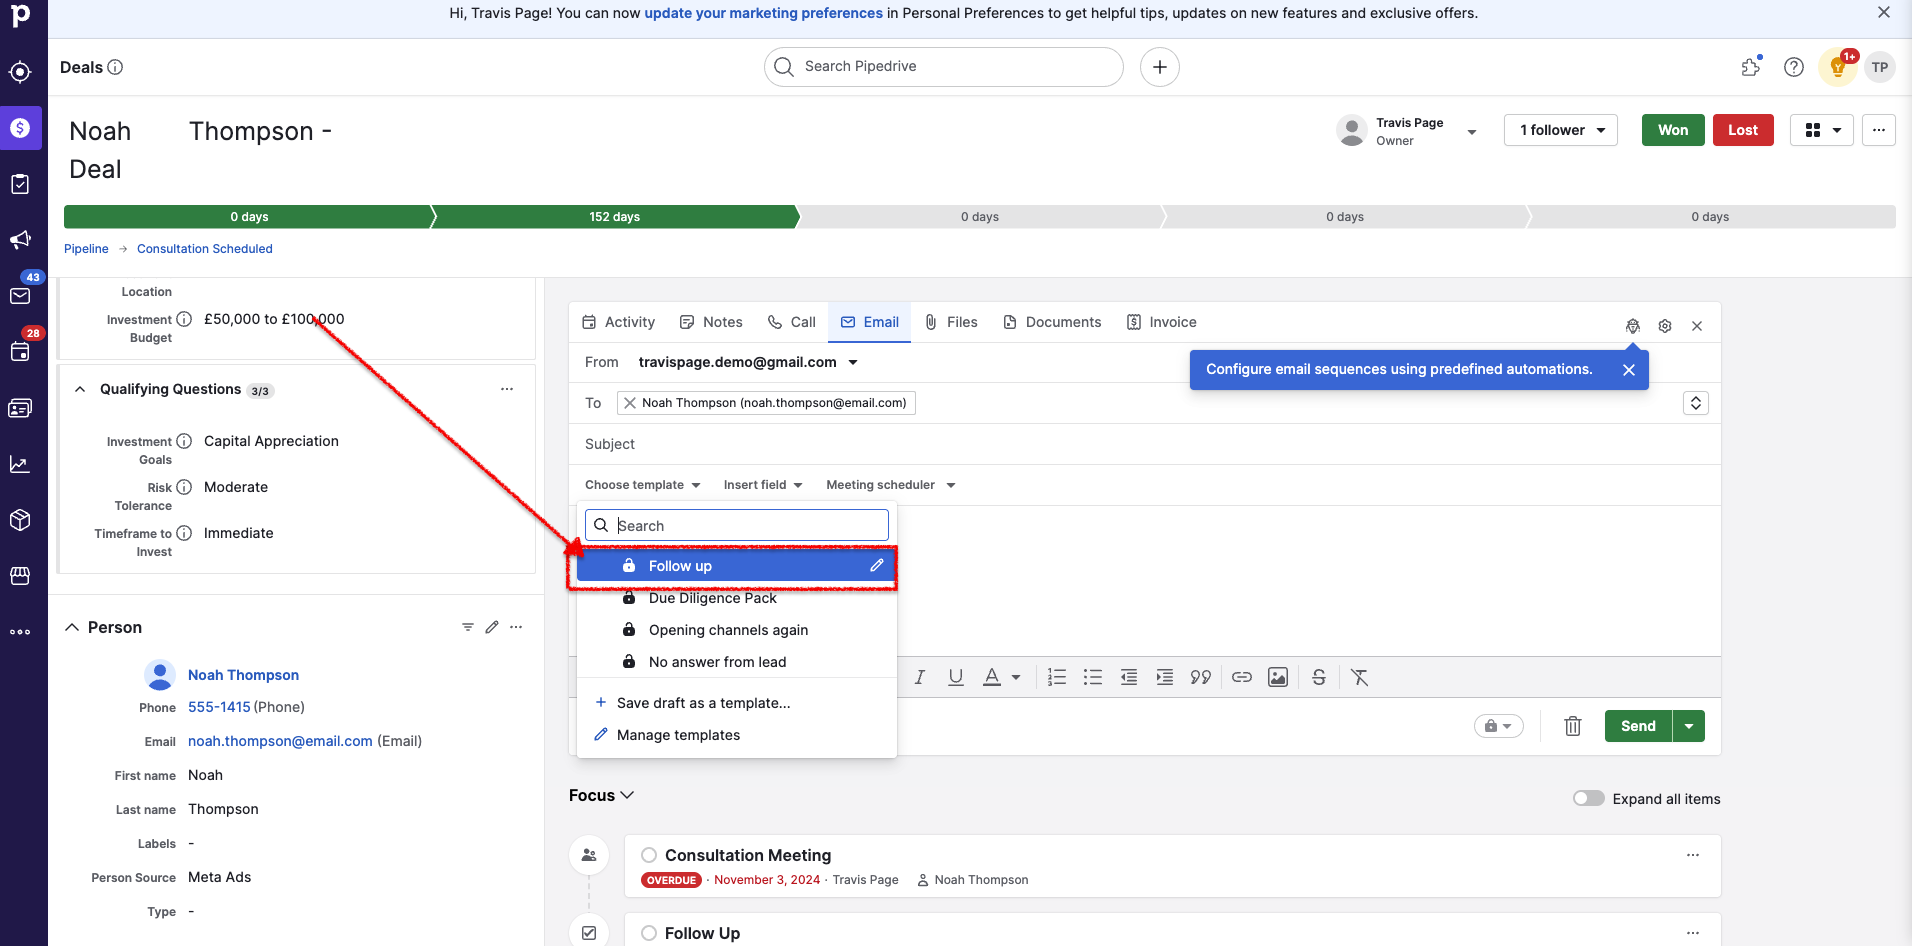
- Using merge fields to auto-fill client-specific info (e.g. first name, deal value)
6. Define Activities + Sync Calendar
Create a list of custom activity types that reflect real sales actions:
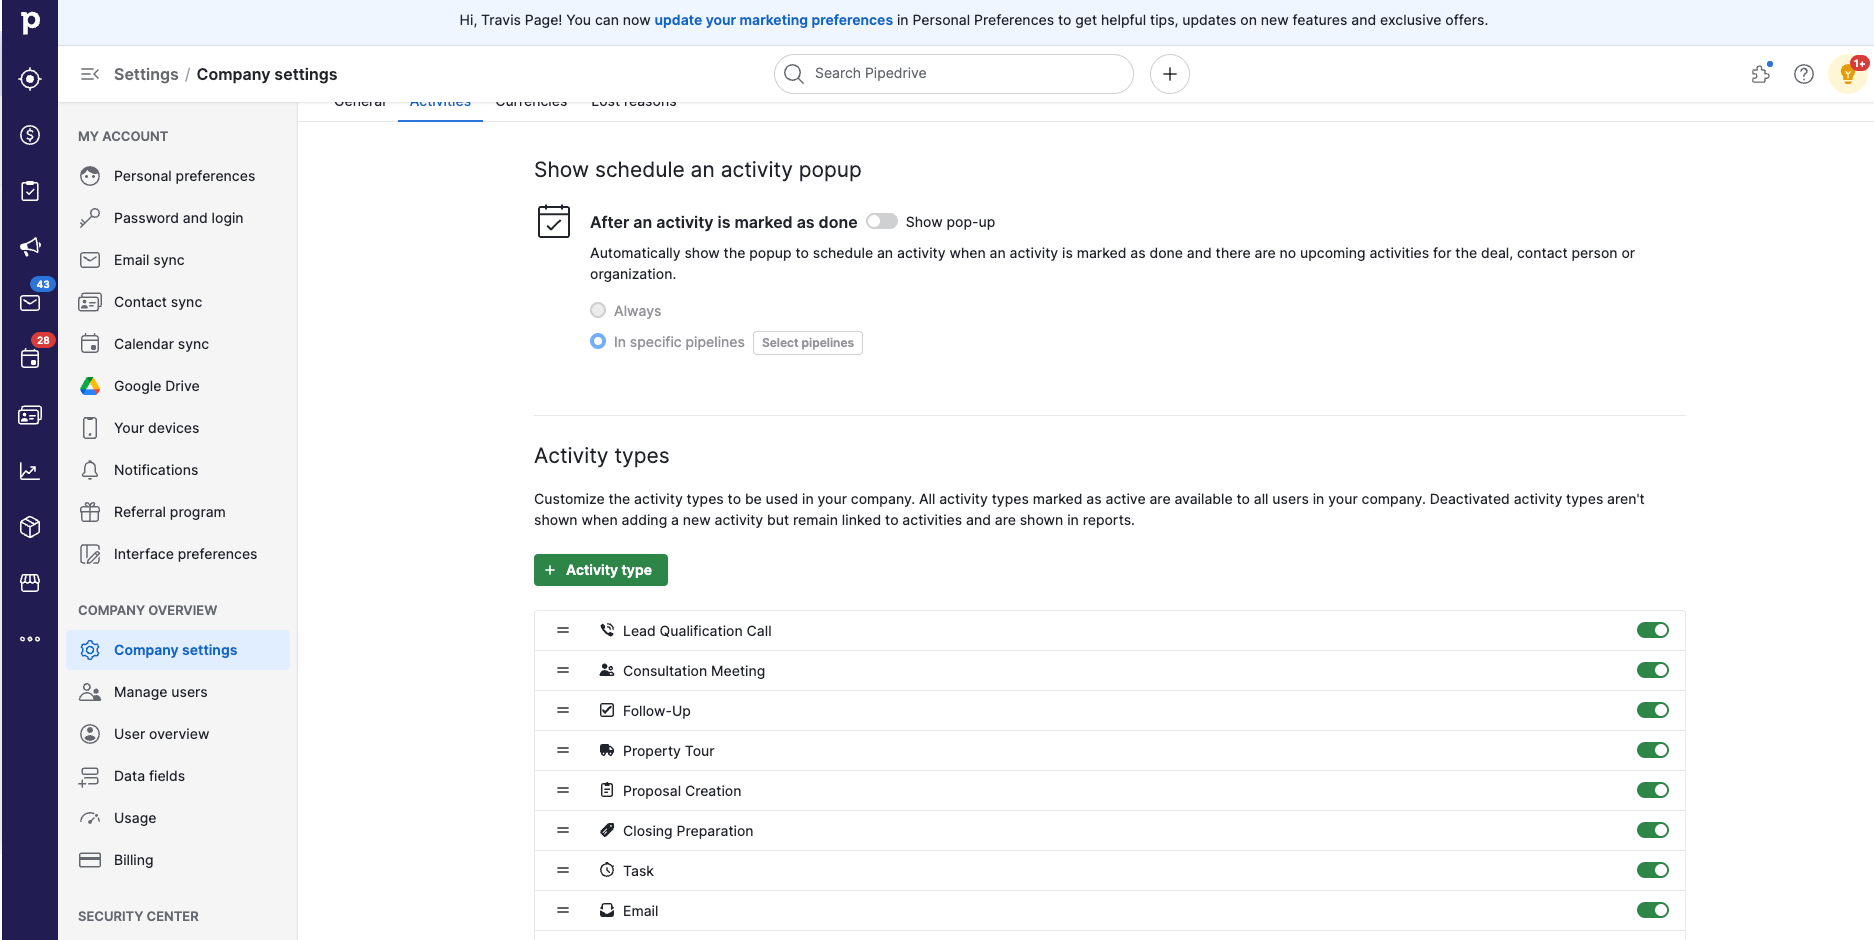
- Qualification Call ☎️
- Consultation 🧑💼
- Document Sent 📄
- Property Tour 🏡
Add emojis or icons for visual clarity.
Then, sync each user's calendar so Pipedrive activities show up in Google/Outlook (and vice versa).
7. Enable Scheduler + Configure Products
Use Pipedrive’s scheduler feature to let prospects book directly into your team’s calendar.
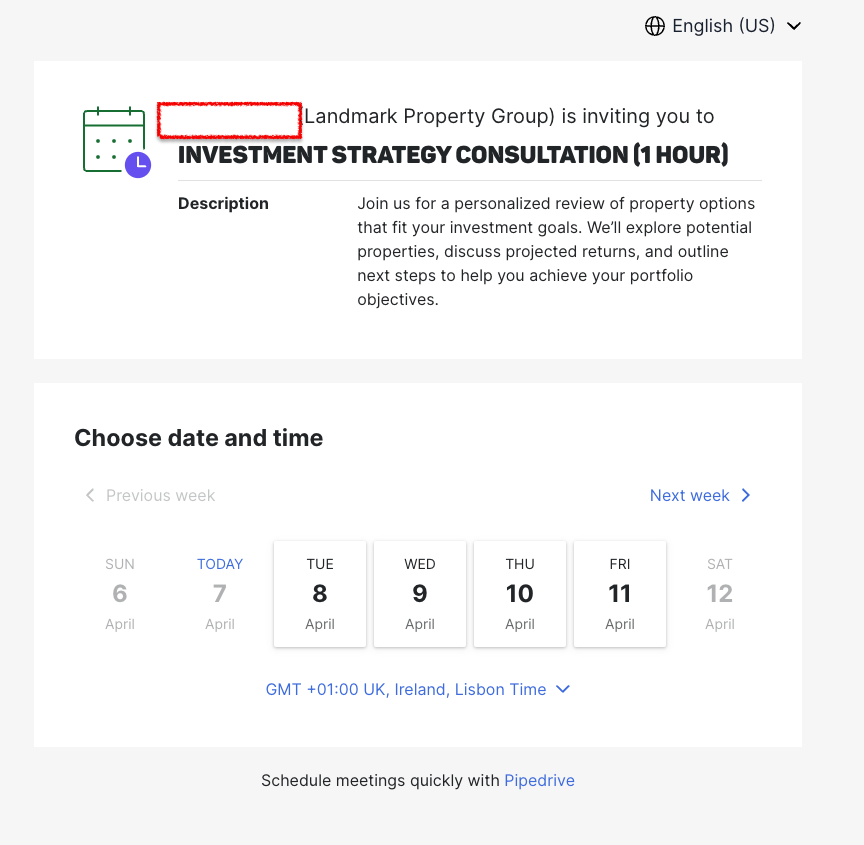
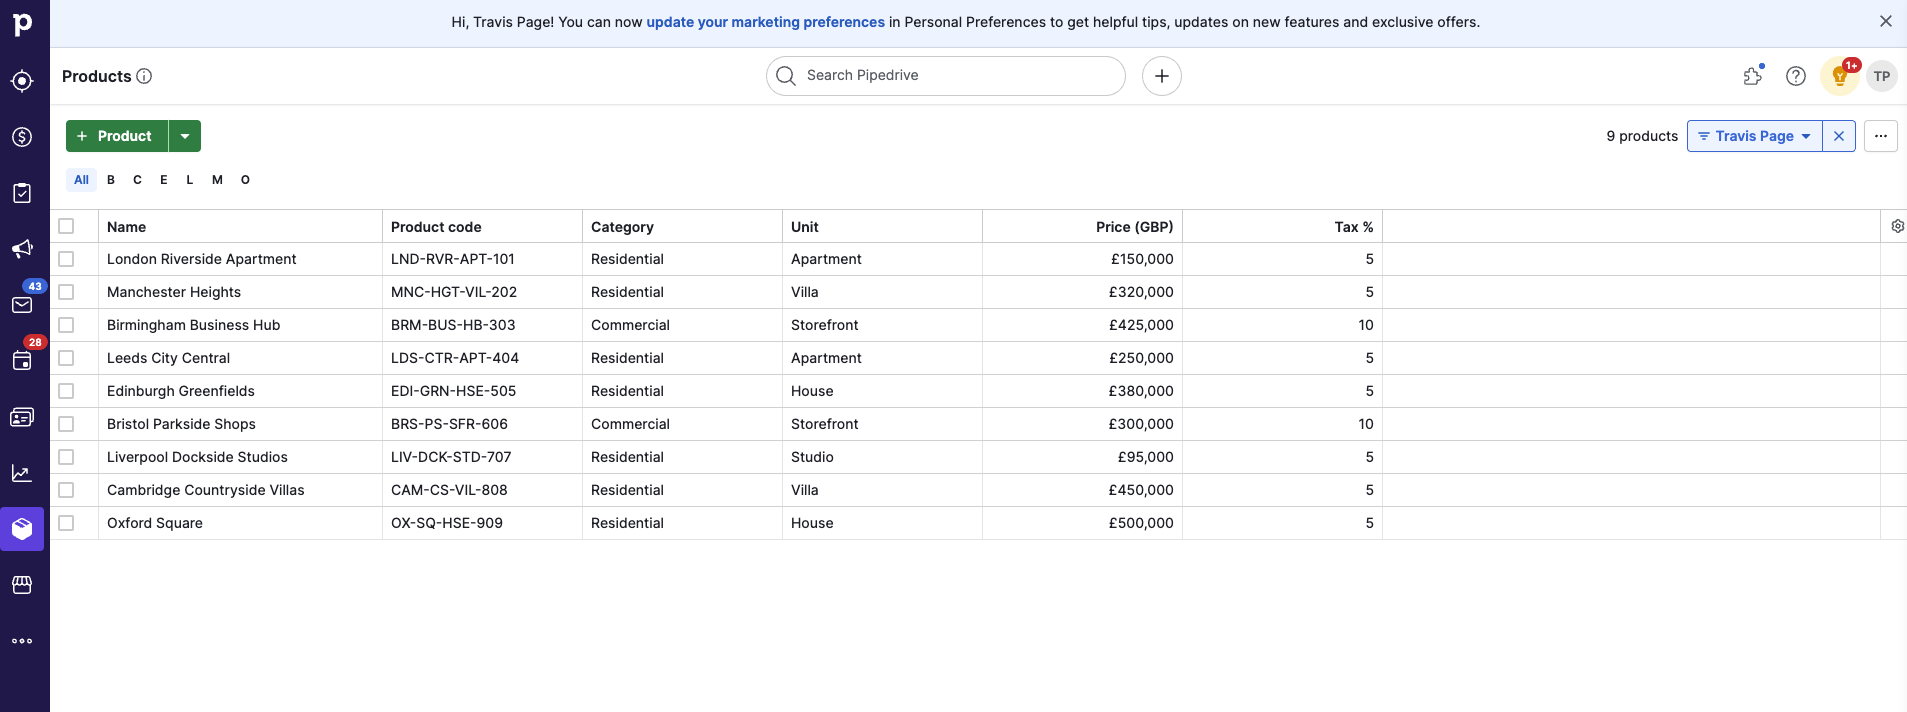
Then set up Products in Pipedrive so that each deal can have specific offerings attached. This enables:
- Automatic deal value calculation
- Cleaner reporting by service type or unit sold
- Easier proposal generation (via Pipedrive Docs)
8. Build Essential Automations
At a minimum, implement automations that support:
- Sales enablement (e.g. task creation on stage change)
- Nurture emails
- Pipeline movement logic (e.g. “If no activity in 7 days, send reminder”)
- Lost deal follow-up sequences
- No-show recovery flows
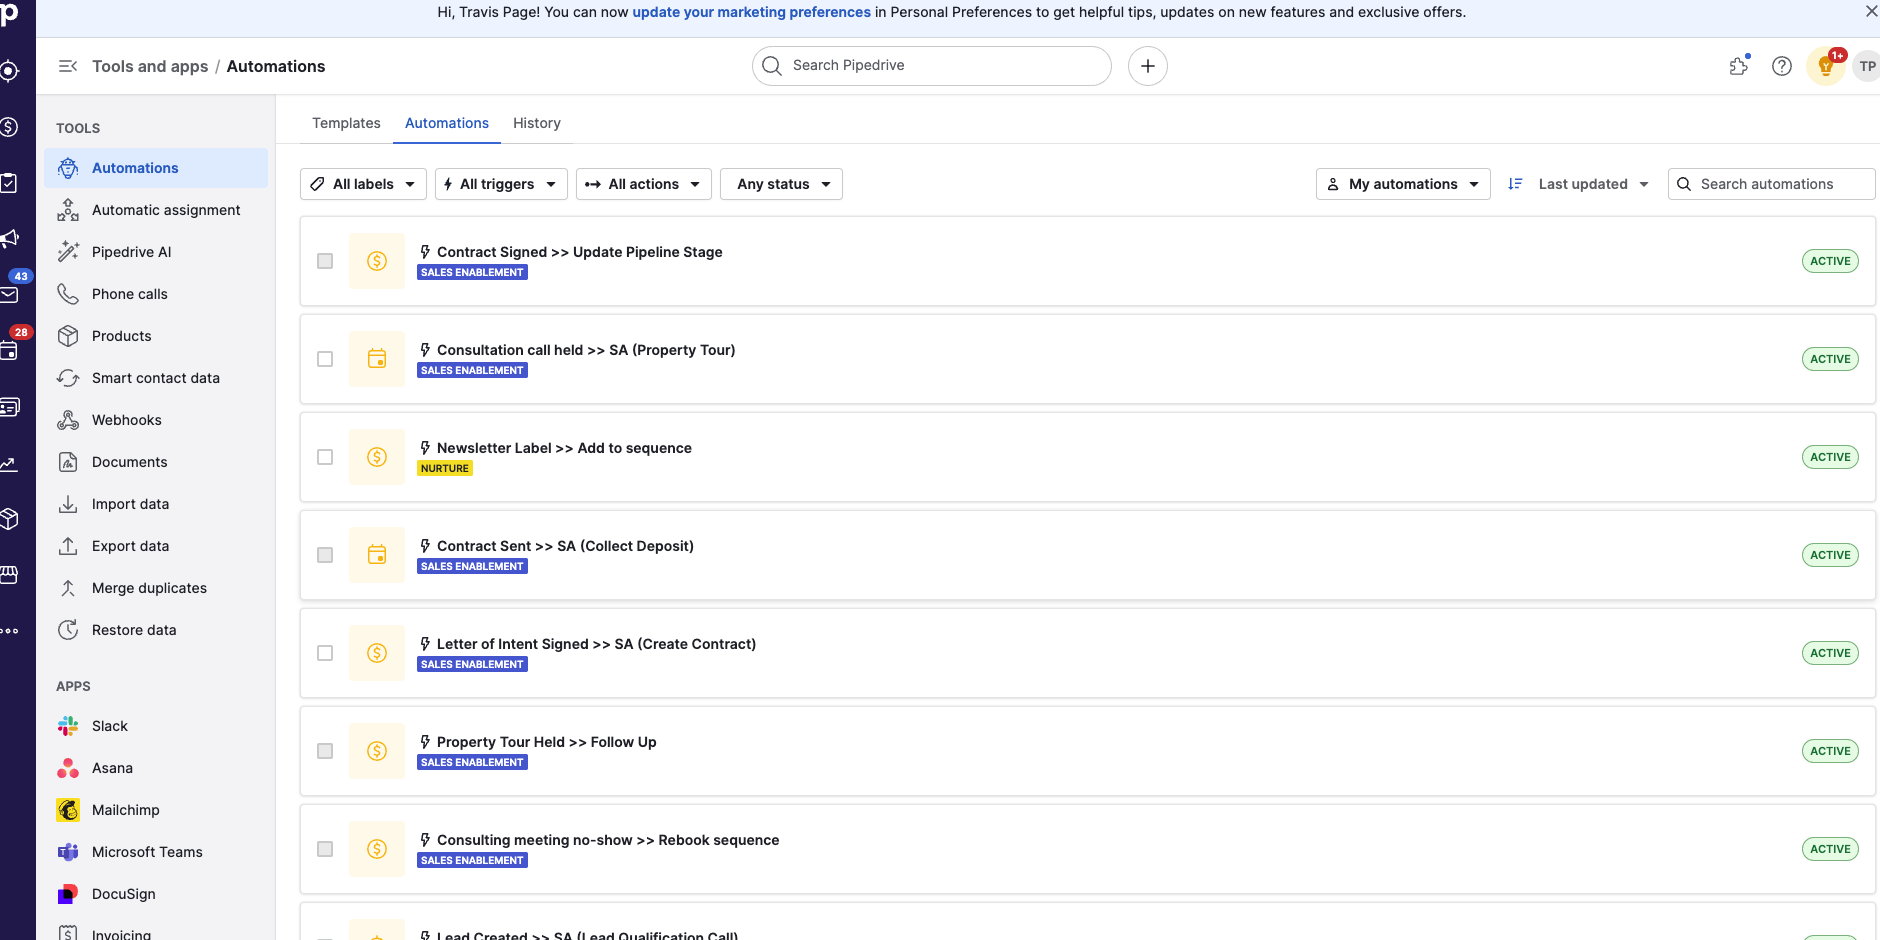
⚙️ We typically build 10+ automations in larger setups. This document includes only the essentials.
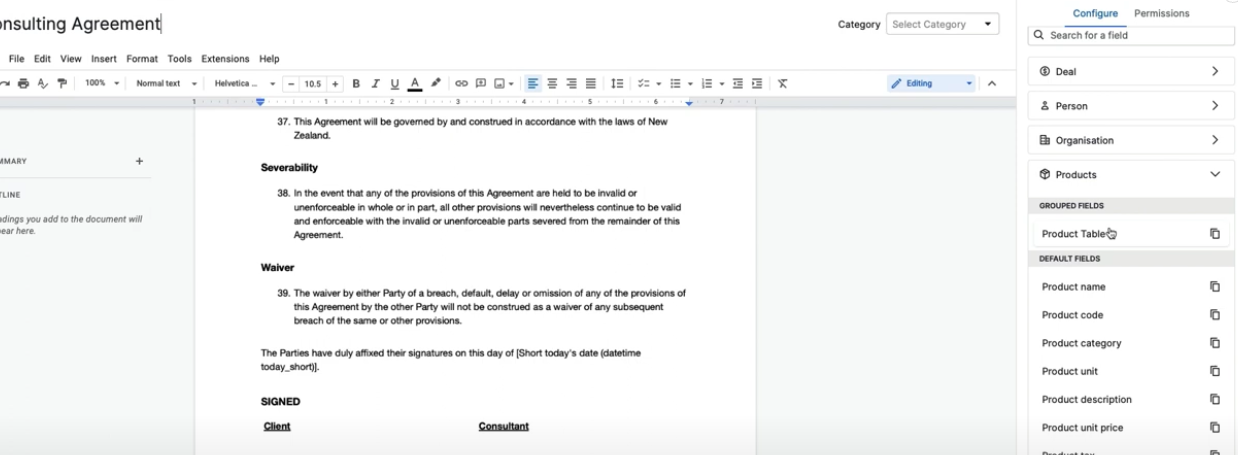
9. Optional: Enable Pipedrive Documents
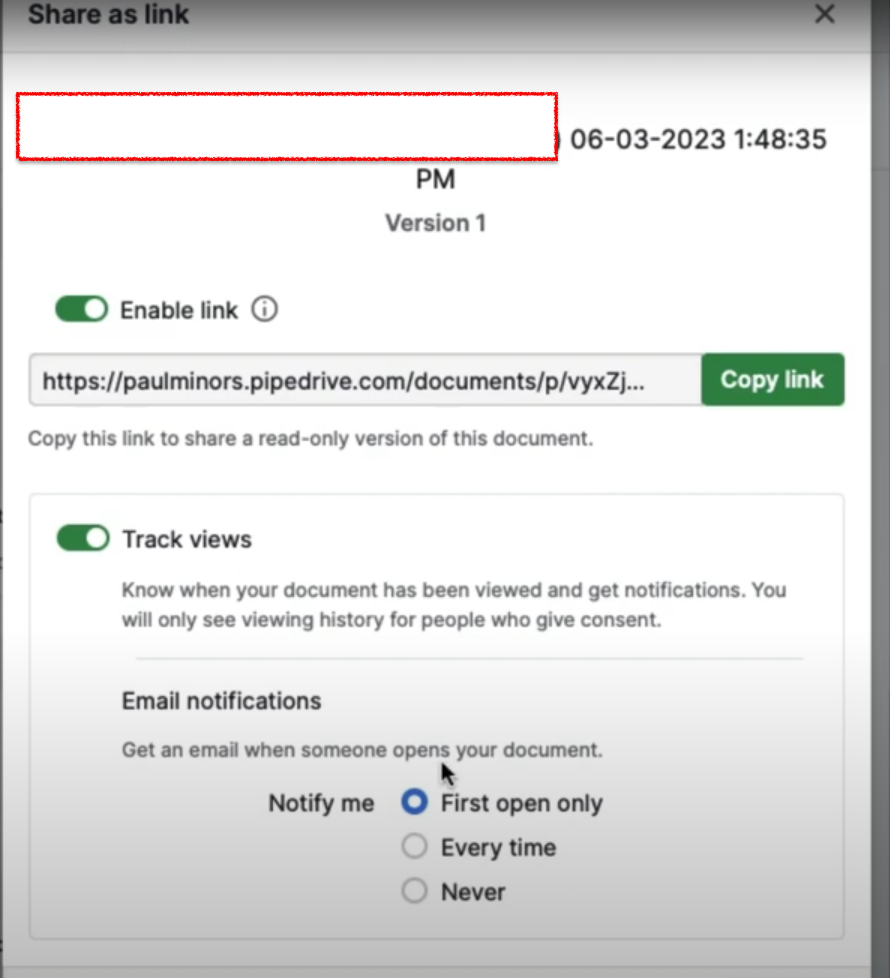
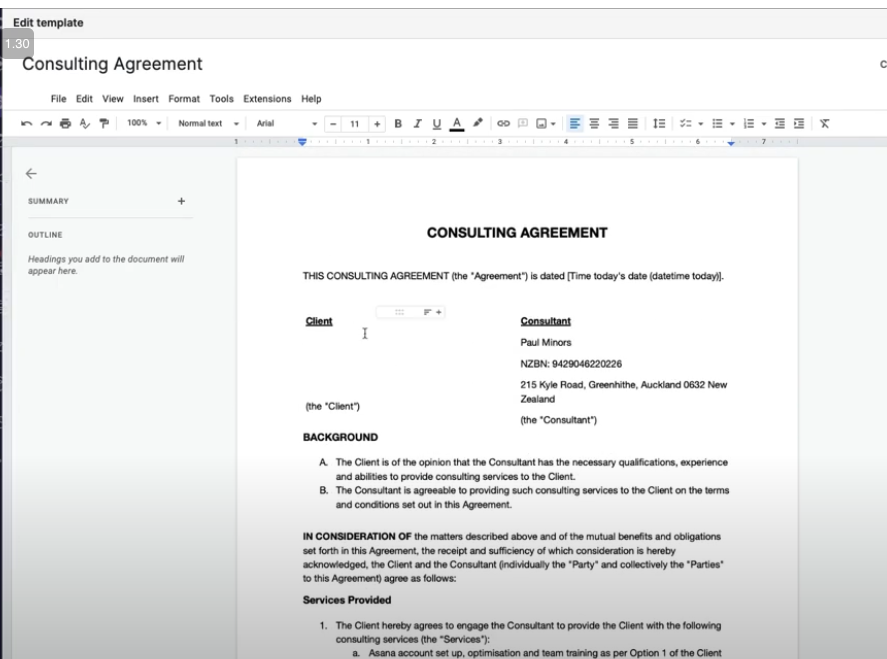
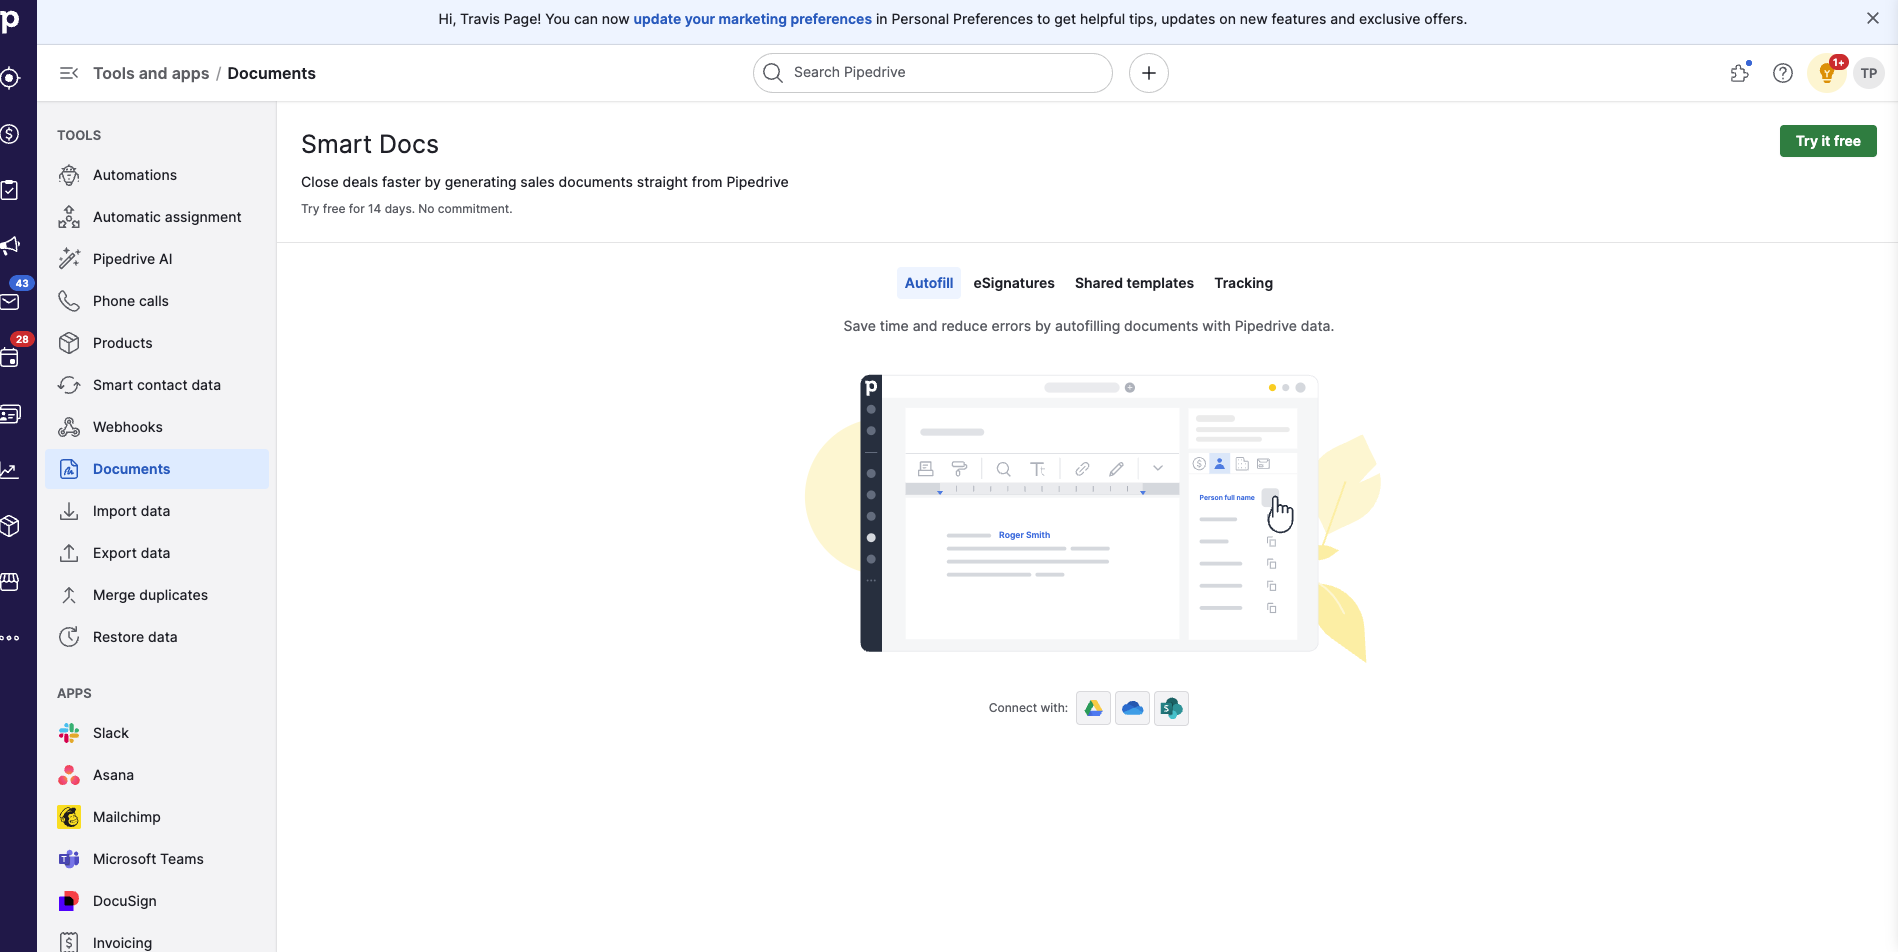
For teams that send contracts or require signatures, enable Pipedrive Docs to:
- Create proposals from deal data
- Send out e-signature requests
- Track document opens and completions
Example images of Documents in Pipedrive
Final Thoughts on the Base Build
Some teams will already have parts of this setup. Others will be starting from scratch. Either way, this base configuration helps avoid:
- Dirty data
- Pipeline bloat
- Missed follow-ups
- Poor source attribution
Start here — then layer in complexity as needed.
SECTION 2: LEAD CAPTURE — STRUCTURE & AUTOMATION
Why It Matters
Poor lead capture leads to pipeline clutter, inaccurate reporting, and lost deals. This section outlines how to build a scalable, attribution-friendly lead intake system inside Pipedrive.
1. Use the Lead Inbox (Not Deals)
Every new lead — whether from ads, forms, or imports — should be routed to the Lead Inbox, not directly created as a deal.
Why?
- Deals represent qualified opportunities
- Leads are still in evaluation mode
- This keeps your pipeline clean and your reporting honest
2. Automatically Track Lead Source
Every lead entry should include source attribution. At a minimum:
- Primary source (Meta, Google, Website, Manual)
- UTM parameters (campaign, ad set, ad name)
Example: Meta > Campaign: “UK Investors Jan” > Ad: “3 Bed Property Birmingham”
This enables granular ROI tracking beyond just platform-level performance.
3. Capture Core Data Points
When a lead submits a form or is entered manually, the following should be captured:
- First name / Last name
- Email / Phone
- Investment location or interest area
- Budget
- Preferred property type
- Timeline to invest
These fields should be stored under the Lead record, not just the Person object.
4. Auto-Assign Tasks + Send Intro Email
Upon submission, automate the following:
- Assign a qualification task (e.g. “Call new lead within 24hrs”)
- Send a templated welcome or acknowledgment email
- Highlight new leads in the inbox (e.g. bolded or color-tagged)
5. Prevent Duplicates + Standardize Naming
Before a new contact is created, the system should check if that person already exists in Pipedrive. This avoids:
- Duplicate records
- Multiple entries for the same contact across sales agents
- Mismatched data (e.g. outdated phone numbers or conflicting notes)
Additionally, implement a naming convention such as:
[First Name] [Last Name] – Lead
(e.g. Alexander King – Lead)
This can be auto-formatted via Make, Zapier, or Pipedrive’s automation suite.
6. Estimate Lead Value Automatically
You can assign an estimated lead value based on form inputs — especially budget.
Example rule:
“If investment budget is £200,000 and commission is 3%, assign lead value of £6,000.”
This allows you to forecast pipeline value even before a deal is created.
7. Assign Lead Priority Automatically
Use conditional logic to assign “Hot,” “Warm,” or “Cold” labels based on how the form is filled:
- High budget + immediate timeline = Hot
- Medium budget + 3-6 month window = Warm
- Low budget + no clear intent = Cold
These labels help SDRs or VAs triage leads quickly.
8. Keep the Data Clean
- Use auto-formatting on name fields
- Require standardized dropdown responses for source/interest area
- Automate corrections to bad input where possible (e.g. capitalizing names)
Summary
Lead capture isn’t just about collecting info — it’s about structuring it for action. Clean input, source tracking, and task automation make or break your pipeline further down the line.
SECTION 3: DEAL CREATION — QUALIFICATION & CONVERSION
Why It Matters
Randomly creating deals from unqualified leads pollutes your pipeline, inflates reporting, and overwhelms sales reps. This section covers how to qualify and convert leads into structured deals.
1. Qualify Inside the Lead Inbox
Every new lead should go through a basic qualification process before being moved into the pipeline.
Key questions to assess:
- Is the lead an end user or investor?
- Do they meet the budget threshold?
- What’s their investment timeline?
- What’s their experience level?
If they don’t meet the criteria, mark them as Not Qualified and archive them (or push to a long-term nurture list).
2. Use “Convert to Deal” — Not “New Deal”
If a lead is qualified, use the Convert to Deal function. This preserves:
- Contact linkage
- Source data
- Activity history
- Custom field mappings
Manual creation = lost data and disconnected workflows.
3. Automate the Next Sales Activity
Upon conversion:
- Move the deal to the “Initial Contact” or “Consultation Booked” stage
- Auto-create a relevant task (e.g. “Send Proposal” or “Book Property Tour”)
- Adjust the label from “Lead” to “Deal” accordingly
This keeps your pipeline momentum strong and sales agents clear on next steps.
4. Retain Full Attribution
When converting, all source and UTM data should remain intact so you can track the lead through close.
Example:
Alexander King → Meta Ads > Campaign 3 > Booked Consultation > Deal Won
✅ All data flows through without loss.
5. Handle Manual Creation Cleanly
If a deal is created manually (e.g. by a sales agent in a rush), use automations to clean up:
- Deal name formatting
- Missing contact links
- Missing value or source fields
- Duplicated contacts
Summary
Only qualified leads become deals.
Convert, don’t create from scratch.
And let automation fill in the rest.
SECTION 4: APPOINTMENT BOOKING + FOLLOW-UP
Why It Matters
Appointments — especially discovery or consultation calls — are the highest leverage moment in the pipeline. They need to be easy to book, automatically tracked, and followed up.
1. Use Calendar Scheduler Integration
Set up a Pipedrive (or connected tool like Calendly/Google Calendar) scheduler so leads can:
- Book time directly from emails or after calls
- Choose their own time zones
- Get automatic reminders and confirmations
Calendar events should:
- Sync with the rep’s calendar
- Be added to the deal record
- Show up in Pipedrive as an activity
2. Automatically Update Pipeline
Once a call is booked:
- Move the deal to “Consultation Scheduled”
- Remove any “No Activity” warnings
- Auto-create a task for the rep to prep or confirm attendance
3. Handle No-Shows With Rebooking Flows
If a lead misses their appointment:
- Tag the deal as “Appointment No Show”
- Trigger a rebooking email sequence (e.g. “We missed you! Click here to reschedule.”)
- Wait a few days between steps
- If no rebooking, create a task for the rep to manually follow up
4. Record Meeting Outcomes
After the meeting is held:
- Move the deal to “Consultation Held”
- Add notes or meeting outcomes to the activity
- Create the next sales step (e.g. send brochure, offer call, property tour)
If applicable, add a product to the deal — this will automatically update the deal value.
5. Track Everything Visually
Use labels, icons, and standardized stage names to make it easy to see:
- What meetings are scheduled
- Who missed theirs
- Who's moving forward
- Who needs follow-up
Summary
Your meeting workflow should answer:
- Has the lead booked?
- Did they show?
- What’s next?
This keeps your pipeline friction-free and your team on the front foot.